Pages - Menu

Wednesday, April 29, 2009

Whole Foods Egg Salad


I love this egg salad. Whenever I stop by Whole Foods to pick up lunch and I am not really sure what I want to eat, I usually pick up this salad and a loaf of bread. Whole Foods is expensive and I can easily spend quite a bit of money on a few meals. The nice thing about many of Whole Foods products is the fact that they list their ingredients on the label. I've recreated several Whole Foods products by reading the label.

The last time I purchased their egg salad, I saved the lid. I was able to make a clone of their egg salad. It was pretty easy. I already have their canola mayonnaise. I didn't bother with using their 365 brand for the other ingredients. I roasted my own red pepper instead of opening up a jar of roasted red peppers because I had half a red pepper that I needed to use up. I stuck it in the oven while the eggs cooked and while I cut up the insanely large watermelon I bought from Costco this weekend.

The directions for the salad is pretty easy. Mix everything up and chill before serving.

5 eggs, hardboiled and sliced
¼ cup roasted red peppers, sliced
½ cup canola mayonnaise
1 teaspoon brown mustard
salt
pepper
1 green onion, sliced
2 teaspoons parsley, chopped

Monday, April 27, 2009

Pandan Chiffon Cake


I’m on a foam cake kick. Maybe I’ll bake my way through the different types.

I noticed that I’ve never posted any recipes using pandan (pandanus or screw pine leaves). Pandan is a popular flavor in many Asian recipes. I buy a little bottle of the thick-ish extract to use to flavor agar-agar and coconut jigglies. My aunt likes to make pandan cakes in various forms. Her steamed pandan cakes are delicious and her baked rice flour pandan cake is to die for. She uses the little envelopes of baking powder sold at Asian grocery stores. She swears it is different from the stuff in the regular grocery stores. I have only seen pandan leaves once in my life. I was still very young and my mom made pandan flavored chendol noodles. My mom, despite her awkwardness in the kitchen, can make some delicious Asian desserts. It was her specialty.

I didn’t have a tube pan and since I’ve been reading about sponge cakes, which lead me to reading about chiffon cakes, I was compelled to go buy a tube pan just for making this cake. I have a bundt pan but somehow I didn’t think it would work. I even saw a woman jerry-rig a regular springform pan with a small tin can in the middle. I was looking for a non non-stick pan but the closest I was able to find was one of those lighter non-stick pans. I crossed my fingers and hoped for the best. The alternative was to slowly scrape away the non-stick finish off the pan. Oh and get one with removable bottom or you’ll spend an eternity trying to get the cake out of the pan. The batter will stick even to the non-stick pan.

I took care to clean all my bowls and tools. I hid all the plastic bowls. One thing I learned from Home Ec class in the 8th grade was that plastic was evil when it came to making meringues. The reason is because no matter how hard you scrub, you can never remove the fat adhered to plastic. We often beat our egg whites in copper bowls in order to stabilize the whites. I don’t happen to own any copper bowls. I would love a copper kitchen but most copper options (such as the Williams-Sonoma exclusive copper KitchenAid mixer) cost more than the stainless or white options. In lieu of the copper bowls, we use cream of tartar to help stabilize the whites. Ever put cream of tartar on your tongue? Don’t try it. It is so acidic that it will make you really pucker up. The cream of tartar stabilizes the whites and keeps the liquid from leaching out. Without the cream of tartar, soon after whipping, you will see a pool of water form at the bottom of your bowl. No fun.

In order to ensure a successful chiffon cake, you should use slightly more egg whites to yolks. Hmm...I hate wasting eggs so I have this handy dried egg white powder (aka meringue powder) just for moments like these. What am I supposed to do with 2 extra egg yolks? (The extra whites from the last time I made creme brulee are still in the freezer. Perhaps one day it will become an omelet.) I use the powdered egg whites when I need a little more whites or when I make royal icing.
Pandan Chiffon Cake

Ingredients:
150 grams unbleached all-purpose flour
2 teaspoons baking powder
200 ml coconut milk (half a small can of Chaokoh)
8 egg yolks
10 egg whites or 8 egg whites and 4 teaspoons egg white powder + ¼ cup water
140 grams baker’s sugar
¼ cup canola oil
1 teaspoon vanilla extract
¼ teaspoon salt
1 teaspoon cream of tartar
2 teaspoons pandan extract

Mise en Place:
1. Clean and dry your mixer bowl. You want to make sure you remove all remnants of fat from the bowl.
2. Measure flour and baking powder and sift together. Set aside.
3. Separate egg yolks from whites. Put the egg yolks into a large mixing bowl but not your mixer bowl (unless you have an extra mixer bowl.) Hold egg whites in a glass or metal bowl but not in a plastic bowl. Remember fat is the enemy when you are trying to beat egg whites to stiff peaks. Reconstitute powdered egg white if using.
4. Measure out 60 grams of baker’s sugar and mix with cream of tartar and salt. Set aside.
5. Measure out the rest of the ingredients.

Directions:

1. Preheat over to 350 degrees.

2. Add 140 grams of baker’s sugar to the egg yolks and using a wire whisk or hand mixer, beat until thick and creamy. Add coconut milk, oil, vanilla extract and pandan paste to egg yolk mixture. Continue to mix until thick and frothy.

3. In your mixer bowl, add egg whites and your 60 grams of sugar, cream of tartar, and salt mixture. Beat on medium speed (approximately speed 4) until soft peaks are reached. Switch mixer to medium-high (approximately speed 8) until stiff peaks are reached.

How can you tell when you have peaks? If you have a tilt-head mixer you can simply tilt the mixer back and check the whisk. If you are using a hand mixer, you can lift the mixer out of the bowl, hold it upside down and check the beaters. I have a bowl-lift mixer so I use intuition. When it appears right, I unplug the mixer, lower the bowl, remove the whisk attachment, then take a dollop of the whites, invert the whisk to double-check.

4. Fold about a quarter of the egg whites into the batter and then gently fold the rest of the whites into the batter. Be gentle so that you do not deflate the whites. I don't worry too much about getting the mixture completely mixed together. That is why I get streaks of white. I would rather have some streaks instead of a flat chiffon cake.

5. Pour the batter into a chiffon, tube, or angel food pan and bake about 45 minutes or until a skewer inserted comes out clean.

6. Remove from oven and immediately invert the cake and allow to cool about 2 hours. (Some people suggest inverting the pan on a wine bottle but I don’t really like the idea. The cake is up too high and is top heavy. If the cake should release itself from the pan, you have one hell of a mess. I like to rest/balance the inverted pan on two small three-inch high mini bundt cake pans. This allows enough air to pass so that the steam is release but is not too high that if the cake decides to release from the pan, it doesn’t gain any acceleration and damage itself as it falls.) Once the cake is cooled, gently run a knife or spatula around the edges and release cake by pushing the bottom up. Once you get the cake out of the pan, you will need to run a knife between the cake and the bottom portion of the pan to remove the tube. Be careful not to scratch the pans. I never serve baked goods in the pan that they were cooked in. I don’t trust people with knives cutting into my pans.


See the egg white streak?


High Altitude: I bake at high altitude (5,280 ft above sea level) and I usually try baking things first without making any suggested altitude adjustments and see the results. If I don’t like the results, I will try one of the suggestions. In this case, I didn’t have do adjust. The cake rose really nicely in the oven but during the last ten minutes of baking, it slightly deflated and collapsed a bit but the cake was still very moist, fluffy and yummy. Some adjustments to consider if not successful: slightly under-beat the whites, use less baking powder, place the cake in a cool instead of a preheated oven and bake for regular time.

So one of the reasons why I have been neglecting the blog is because of baseball. For us, baseball season started on April 10th and although we have not gone to every game, we still spend a lot of time watching it on tv. (Who would have thought that I would watch baseball on tv? Strange.) We went last night. The bf is going tonight and tomorrow.

Dinger, our mascot is dancing on top of the visiting team's dugout during the 7th inning stretch.
We are dedicated fans. It was 35 degrees out last night and the Rockies were playing one of their regular teams (the Padres). The top deck and the rockpile were pretty much empty. We are baseball snobs. We won't go to a baseball game if we have to sit on the upper deck.
Below is a picture of Brad Hawpe. He was injured during last night's game. It was very tense last night as we watched him lay on the ground for a good 5 - 10 minutes after he was hit in the head by a baseball. The catcher tried to throw him out on second base and the ball hit him. I hope he recovers soon.

Saturday, April 25, 2009

Génoise Cake with Chantilly Cream, Strawberries and Toasted Almonds


Edit 4/26/09: Oh my! This cake is so much better the next day. I just had a piece about 24+ hours after assembling it and it tastes so much more like a Chinese birthday cake. The sugar syrup and the Chantilly cream soaked into the cake, making it moister. The almonds almost got a little soft, just like how the almonds on a Chinese cake gets soft after sitting in the display case for several hours. No need to tweak the recipe now. The only tweak I think I would make is to try to get a finer texture. Chinese birthday cakes use some kind of superfine flour. This cake will make another appearance on someone's birthday. Too bad I won't be celebrating my birthday anywhere near a kitchen.

What I set out to make was a Chinese birthday cake. The kind of cake my parents used to buy for me on my birthdays. I was hoping a tweaked génoise cake would provide a suitable substitute since Chinese birthday cake is from the sponge cake family. The tweaked génoise is quite delicious but is not exactly a Chinese birthday cake. Chinese birthday cake is a light, fluffy and slightly sweet sponge cake with a light whipped frosting and filled with you choice of strawberries, bananas, pineapple or thick slippery coconut jelly. I like the strawberry and coconut combination but I'm not sure where to purchase the coconut jelly.

This génoise cake is light but has a somewhat drier texture than a Chinese birthday cake. It is a very versatile cake and can be used for many different applications such as petits fours, jelly rolls and the base for baked Alaskas. The cake was not the Chinese birthday cake I set out to make but it wasn't a disappointment. It is the perfect cake for me since it doesn't require piping any frosting or any real cake decorating skills. (My lack of fine motor skills is the reason why I didn't go into the baking and pastry program.)

Below is the recipe for a génoise cake. I don't want to call it a Chinese birthday cake because despite my tweaking, the texture is more génoise-like. I will try tweaking the recipe until I get it more Chinese birthday cake-like.

Here is the recipe from Williams-Sonoma for Strawberry Génoise with Whipped Cream. There is a very pretty picture of the cake but I didn't exactly work off that recipe.

Génoise Layer Cake with Chantilly Cream, Strawberries and Toasted Almonds
Ingredients:
(make one 9-inch round cake)

Cake:
4 extra-large eggs, at room temperature
120 grams sugar
4 grams salt
150 grams cake flour
35 grams canola oil
35 grams milk

Syrup:
¼ cup granulated sugar
¼ cup water
1 teaspoon cherry flavored brandy or liqueur such as Kijafa, Kirschwasser or Acerola

Chantilly Cream:
1 cup heavy whipping cream
1 tablespoon sugar
1 teaspoon vanilla extract

Garnish:
½ cup toasted slivered almonds
1 pound strawberries, sliced

Directions:

1. Preheat oven to 350 degrees. Line a 9-inch round cake pan with parchment paper and spray oil on sides of pan. Sift the cake flour and set aside.

2. In the bowl of an electric mixer, whisk eggs, sugar and salt by hand until combine. Place the bowl over a bain-marie and gently whisk about 3 minutes. Remove from bain-marie and with the balloon whisk attachment of an electric mixer, beat on high (Speed 8) until the mixture is pale, tripled in volume and forms thick ribbons, 5-7 minutes. Turn mixer to low (speed 4) and whisk for another two minutes to stabilize the mixture.

After whisking for about 10 minutes, the egg mixture forms thick ribbons.

3. Add sifted cake flour to the batter and gently fold in the flour until well blended.

4. Mix about a third of the batter with the oil in a separate bowl and then fold the mixture into the rest of the batter. Add milk and gently fold until fully incorporated. Be very careful during the folding. Do no over-fold or the batter will deflate.

5. Pour the batter into the prepared pan and bake about 20 to 30 minutes or until skewer inserted comes out clean.

6. While cake is cooling, make the sugar syrup. Bring sugar and water to a boil over medium heat until dissolved. Remove from heat, allow to cool and then add the cherry liqueur.

7. When cake is cool and ready to assemble make Chantilly cream. Combine the all the ingredients of Chantilly cream in the bowl of any electric mixer. With the balloon whip attachment, whip until cream forms medium-stiff peaks. Set aside.

Chantilly cream is pretty much a fancier name for whipped cream.

8. Cool cake on wire rack. Run a knife around the outer edges to aid removal of cake. Invert cake on to a clean work surface. Using a sharp slicer, slice the cake into 2 layers. Place the top layer, cut side up, on a serving platter. Brush the layer with sugar syrup. Spread a third of the Chantilly cream on the layer. Top with sliced strawberries. Position the second layer on top of the first (cut side down). Brush with the remaining sugar syrup. Spread the remaining Chantilly cream on top and sides of cake. Garnish edge of cake with toasted sliced almonds and decorate top of cake with sliced strawberries. Refrigerate until ready to serve.

Cake sliced into two layers.

The golden color of sponge cakes look wonderful with red strawberries.

Friday, April 24, 2009

Rice Porridge: Meal of Leftovers


Many Asian families make a pot of rice for their evening meal. In the morning, the leftover rice is turned into breakfast. I read that this is very typical. However, in my family we were not very typical. We never had rice porridge for breakfast. Maybe it is because my dad never really cared for it. Even though we never had this for breakfast, it appeared from time to time. Sometimes my grandmother would make it because I wanted some or because someone was ill.

My grandmother made a few different versions and from her I learned how to make the different variations. For a heartier meal, I like to make it with chicken and top it with a lot of different toppings. When I am sick I make it with three ingredients: water, rice, and salt. It is very bland and I boil the hell out of the rice.

As I was driving home today, I had a craving for rice porridge. (I've been turning to quick meals lately. It is baseball season, the Nuggets are in the playoffs, the weather is nice and I have been a little busy at work. What other reason do I need to be lazy?)

8 cups water
1 piece dried galanga
1 kaffir lime leaf
salt
MSG
fish sauce
1/2 pound ground pork or minced chicken breast
2 cups leftover cooked rice
8 shrimp, peeled a deveined; optional

Toppings:
youtiao (Chinese cruller)
pork floss
black pepper
salted duck egg
fried garlic or fried onion
fried chili in oil
soy sauce or Golden Mountain brand seasoning sauce
cilantro
green onions

Directions:

Bring a pot of water to a boil with galanga, kaffir lime leaves, salt and MSG to a boil. Add minced pork or chicken. Return to a boil and then add the cooked rice. Boil until desired consistency is achieved. This can be as little as 10 minutes to as long as hours. I prefer the grains of rice intact so I cook for about 10 to 15 minutes.

To serve: Ladle into bowls and top with desired toppings.

Thursday, April 23, 2009

Cranberry Pumpkin Bread


I got this recipe from an old coworker. I've been making this for the past 7 or 8 years. My coworker was diabetic so her recipe indicated Splenda as the sweetener. I've taken the liberty to use regular sugar instead. She also used fresh cranberries. I've tried fresh and frozen cranberries. They are a little too tart for me and I don't like the mushy berries in my bread. I found unsweetened sun-dried cranberries at Whole Foods and have been using it in many of my recipes. The bread is such a beautiful color. I usually make this during the fall but I just bought five cans of pumpkin. They were on sale.

A few years ago, for Thanksgiving, I decided to make a few loaves. I baked them the night before because I knew I wouldn't have enough oven room. My girl friends came over to hang out and they started picking at one of the freshly baked loaves. Before they even realized it, the two of them had eaten an entire loaf. They then decided to start working on a second loaf. I think I quadrupled the recipe that year.

Last Thanksgiving my friend emailed me for the recipe. She wanted to make it for Thanksgiving because my other friend asked her to make it. My grandmother also loves the stuff. My grandmother is pretty hip. She sometimes takes my grandfather to Jack In the Box for a Jumbo Jack. Every now and then I will bake several loaves and mail it to my friends and family. It costs an arm and a leg to mail. Care packages usually do.

yields two 9x5 loaves

3 cups unbleached all-purpose flour
5 teaspoons pumpkin pie spice
2 teaspoons baking soda
1 1/2 teaspoons salt
2 cups granulated sugar (use slightly less than 2 cups)
1 can (15 ounces) pumpkin (do not use pumpkin pie mix)
4 large eggs
¾ cup canola oil (I reduced to
½ cup)
½ cup orange juice
¾ cup unsweetened sun-dried cranberries
¾ cup walnuts, toasted and chopped

Directions:

Preheat oven to 350 degrees. Grease and flour two 9 x 5-inch loaf pans.

Soak cranberries in orange juice and microwave for one minute. Let cranberries soak until plump.

Combine flour, pumpkin pie spice, baking soda and salt in a large bowl. Combine sugar, pumpkin, eggs and oil in another large bowl; mix until blending. Add pumpkin mixture and orange juice/cranberries to flour mixture; carefully stir until moistened. Gently fold in the nuts. Divide batter between two loaf pans.

Bake about 1 hour or until wooden skewer inserted comes out clean.

They can also be baked in small bundt pans.

Tuesday, April 21, 2009

Cellophane Noodle Soup and Other Fun Presents


I posted this soup a long time ago but I didn't post the ingredients or method for preparing the soup. I also made the soup carb-friendly by not using any potatoes.

Growing up this was one of my favorite soups. I’m not quite sure of the origin. It is similar to Thai Kang Chut Wun Sen but it is not exactly the same. I’m not sure if this version is an evolved soup that my mom put together depending on the resources available. I don’t believe the Thai version includes lily buds or potatoes.

I think potatoes are an American addition and the lily buds are a Chinese addition. The lily buds provide a nice delicate and earthy flavor to the soup. I think the only time I ever use lily buds is when I make this soup. I soak the buds in hot water and when they are malleable, I tie them into little knots. I never really understood why we tied them in little knots. Recently I learned that the reason why they are tied into knots is to keep them for unfurling in the soup.

The other strange ingredient in the soup is wood ear mushroom or as the package reads, “black fungus.” I buy the whole and the sliced versions. I don’t think it adds much flavor to the soup. It is more for the texture. I don’t know how to describe it. It is a little gelatinous and yet crunchy at the same time. It is very similar to cloud ear mushrooms but of a different species. Cloud ear mushrooms are smaller and brown in color while the wood ear is larger in size and black in color. The wood ear mushroom is “tougher” than cloud ears. They can be used interchangeably. Another favorite fungi is the Chinese snow fungus or silver ear.

My mom usually made this with little pork meatballs or ground pork. I only had a boneless chicken breast.

• 1 boneless skinless chicken breast or ½ pound of minced pork or pork meatballs
• 1 dried galangal root (I actually prefer the dried to the fresh. My parents grew fresh galangal root but I grew up eating dishes cooked with dried rather than fresh galangal.)
• Water
• 2 cups diced potatoes
• ¼ cup diced tomatoes (fresh or canned)
• ½ onion, large dice
• Handful lily buds, soaked and tied into knots
• 3 to 4 dried wood ear or 5 to 6 cloud ear mushrooms, soaked and cut into thin strips
• ½ pound shrimp, peeled and deveined
• Fish sauce
• Salt
• Pepper
• MSG
• 2 packages cellophane noodles, soaked
• Cilantro, for garnish

Bring a pot of water to a boil. Don’t worry about the amount. You can always add more in. When water boils, add the chicken breast or pork and reduce to a simmer. Simmer for about ten minutes and then add the diced potatoes. Simmer another 15 minutes or until potatoes are almost cooked. Add the rest of the ingredients except for cellophane noodles and cilantro.

When ready to serve, place a bundle of cellophane noodles in each bowl and ladle soup over the noodles. The hot liquid will cook the noodles. Garnish with cilantro. The reason why I like to add the cellophane noodles is because the noodles will absorb all the liquid if left to sit for too long. I don’t like the texture of the noodles once it sits in liquid for a long period of time.


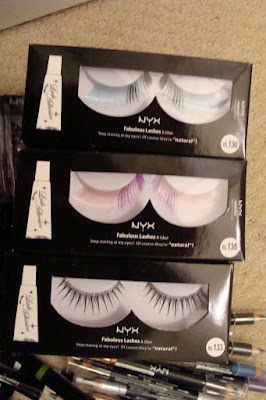
This is not food related but I just had to post about my newest addition to my makeup collection. I'm a huge MAC and Urban Decay addict but I read great things on makeup blogs such as Nessasary Makeup about NYX (pronounced niks) products. Last week while perusing through the slickdeals forum, I ran across a link to the NYX lot sale. A lot of 30 pairs of eyelashes for $24? No it can't be! I had to purchase the eyelashes. I also purchased the 11 lipgloss tubes & 8 eyeshadow trios for $27 and the 10 liquid eyeliners & 20 double-tipped eyeliners/shadows for $22. I saved a butt-load of money! Hey it can't be as bad as the Smashbox holiday shadow set I purchased over the holidays! The shadows are still sitting in my train case.

Urban Decay's 30% off Friends & Family sale just ended on the 17th. I only purchase UD and MAC items during their F&F sales. I didn't buy anything from this last sale since I purchased a hefty amount during the last sale. I was eyeing some of their new 24/7 eyeliner colors but I decided to hold off. Even at 30% off the eyeliners are still over $11 each.

The presents:
Using makeup blogger lingo, "the haul."

The lashes on the top are teal, the middle are magenta and the bottom have rhinestones on the lash line!
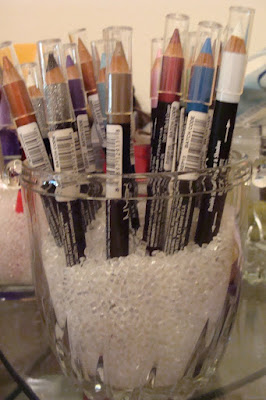
The pencils didn't fit into my train case. So I stored them Sephora style instead. I cannot take credit for these brush and eye pencil holders. I saw them on youtube.
Some of my frequently used eye makeup brushes. My favorite are the Shu Uemuras that my friend bought for me years and years ago. I also like the Ecotools brushes made of bamboo and taklon fibers.

Sunday, April 19, 2009

Lasagna Style Baked Ziti with Pesto and Marinara


I don’t know where I was going with this dish. I wanted to throw something together that was suitable for a cold and dreary spring day in Colorado. I’ve lived in Denver for the last five and a half years and I have never seen anything like this. We got tons of snow (the mountains got 3 to 4 plus feet of snow) and it was all mixed with rain. On Friday afternoon the rain turned into snow and it snowed through the night. On Saturday it was a rain-snow mix but mostly rain here in the metro area. I had errands that I desperately needed to complete so I was out in the slushy mess.

Now back to the ziti. I was craving ziti during the week but I knew that a huge pan of ziti would sit in my fridge for several days and eventually end up in the garbage so I waited until the weekend when the bf was here. When I make baked ziti, I never work off a recipe and the ziti does change quite a bit depending on several factors. This time I wanted to use up some pesto I had in the freezer.

Pesto is one of those things that I like to make in season but shy away from during the off-season. The reason is because of the cost. During the summer when basil is plentiful in gardens and farmer’s markets, it is a practical thing to make and store. What else are you supposed to do with bags and bags of basil leaves? Anyone who has ever grown basil knows that it is very important to continually pinch and clip away at the tips to prevent the bush from flowering and seeding. During the off-season, basil is prohibitively expensive. I like the taste of fresh basil even during the winter months so occasionally I will buy one of those larger flowering herbs. The most cost-effective way to sneak the basil flavor in is to make and freeze pesto. Dried basil is just not the same. Pesto can be purchased in jars or tubs but the quality really varies. I found a brand called Cibo Naturals that I really like. It tastes almost as good as homemade pesto.

1 pound ziti, cooked according to package directions
1 ¼ pounds bulk Italian sausage
½ cup onion, diced
2 cloves garlic, minced
3-4 cups of basic red sauce
salt
pepper
1 15 ounce container part-skim ricotta cheese
½ cup good pesto
8 ounces mozzarella cheese, shredded
4 ounces parmesan cheese, grated
1 cup frozen spinach, thawed and liquid squeezed out

1. Preheat oven to 350 degrees.
2. Brown italian sausage and then add garlic and onions. Cook until onions are soft. Add marinara sauce and season with salt and pepper. Turn off heat and set aside.
3. Mix ricotta and pesto together. Set aside.
4. Now comes the assembling. We will use a similar layering method used for lasagna. Start off with about a cup of sauce on the bottom of a baking pan. Top with half of ziti noodles, ricotta-pesto mixture, mozzarella and parmesan cheese, spinach, and another cup of sauce. Repeat the layering and top the last layer of sauce with mozzarella cheese

I don't like too much cheese on top. I prefer it mixed in.

Friday, April 17, 2009

Giada’s Chicken with Mustard Marsala Sauce Dissected


Every now and then I like to pick a food network chef's recipe, make it and jot down notes for future reference. The notes help me recreate the dish later. The changes I make doesn't necessarily mean that there was a flaw in the recipe. I just have my own preferences when I cook. I usually like to make Giada or Ina's recipes because I usually have success with their recipes. I love Giada's Chicken Florentine recipe and Baked Penne with Roasted Vegetables recipe.

I decided to make Giada's version of Chicken Marsala. I usually make my version of Chicken Marsala from memory but I found her recipe using mascarpone cheese instead of cream. I bought a little tub of mascarpone a few days ago. Wow the little tub was chock full of fat and calories! I worked off Giada’s recipe with some of my own variations. I like to dredge my chicken prior to frying and I like to finish it off in the oven. While the chicken finished in the oven, I made the mushroom marsala sauce and I nappéd the chicken with the sauce. I was a little skeptical (and the bf was more than a little skeptical) of the Dijon mustard but the end result was really good. The bf gave his stamp of approval.

Below is Giada’s recipe in regular font. I struck out the directions that I didn't follow and added what I did in italics.

1 ½ pounds boneless skinless chicken breasts, each breast cut crosswise into 3 pieces
Salt and freshly ground black pepper
seasoned flour (seasoned with salt, pepper, cayenne and marjoram)
2 tablespoons olive oil
5 tablespoons butter, divided
3/4 cup chopped onion
1 pound cremini mushrooms, sliced
2 tablespoons minced garlic
1 cup dry Marsala wine
1 cup (8 ounces) mascarpone cheese
2 tablespoons Dijon mustard
tablespoons chopped fresh Italian parsley leaves, plus whole sprigs, for garnish
12 ounces dried fettuccine

Directions

Flatten chicken breasts with meat mallet or rolling pin. It doesn't have to be thin like viener schnitzle but should be uniform. Pat dry, season and dredge in seasoned flour. Sprinkle the chicken with salt and pepper. Heat the oil in a heavy large skillet over high heat. Add the chicken and cook just until brown, about 4 minutes per side. Transfer the chicken to a plate and cool slightly. Transfer chicken to an oven-proof dish and cook in a 400 degree preheated oven until cooked through.

While the chicken cools cooks, melt 2 tablespoons of butter to the same skillet over medium-high heat, then add the onion and saute until tender, about 2 minutes. Add the mushrooms and garlic and saute until the mushrooms are tender and the juices evaporate, about 12 minutes. Add the wine and simmer until it is reduced by half, about 4 minutes. Stir in the mascarpone and mustard. Simmer a few minutes until sauce thickens slightly. Cut the chicken breasts crosswise into 1/3-inch-thick slices. Return the chicken and any accumulated juices to the skillet. Simmer, uncovered, over medium-low heat until the chicken is just cooked through and the sauce thickens slightly, about 2 minutes. Stir in the chopped parsley. Season the sauce, to taste, with salt, pepper, cayenne and marjoram. Transfer cooked chicken breast on to serving plates and nappé with mushroom mascarpone sauce.

Meanwhile, bring a large pot of salted water to a boil. Add the fettuccine and cook until al dente, stirring occasionally, about 8 minutes. Drain. Toss the fettuccine with 3 tablespoons of butter and season, to taste, with salt and pepper. Swirl the fettuccine onto serving plates. Spoon the chicken mixture over top. Garnish with parsley sprigs and serve.


I decided to make mashed potatoes instead of pasta.
I think the cup of mascarpone was a little too much. I think half a cup would have been plenty.
I decided to slice the onions in stead of chop them.
Marsala wine:
I keep a few fortified wines in my refrigerator. Madeira is pretty handy for deglazing and making a quick pan sauce. Marsala has a distinctive flavor and there is no real substitute when you want chicken marsala. You can sub a different wine such as sherry or even shaoxing but then you wouldn’t be able to call it marsala. You would call it chicken and mushrooms with sherry sauce or chicken and mushrooms with shaoxing sauce. I keep a bottle of marsala for the sole purpose of making chicken marsala and since it is fortified, it keeps for a pretty long time. I buy Florio brand marsala. It is a pretty good brand and is readily available in a well-stocked liquor store. Marsala cooking wine is also available but I cannot attest for the taste or quality since I’ve never cooked with it.

Thursday, April 16, 2009

Italian Soda and French Soda


When I was younger, my friends and I would frequently meet up at Nordstrom's ebar. On occasion I would order something other than coffee because I didn't want the additional caffeine in my system. On cold days I ordered hot chocolate and on hot days I ordered an italian or french soda. Back then I wasn't sure what the difference was. The barrista kindly explained that they were essentially the same drink. The italian soda was made with club soda (or seltzer water), flavored syrup, and ice. When you add half and half to the italian soda, you get french soda.

Italian soda did not originate in Italy. I read that it originated in San Francisco in the 1920s and has become a very popular drink in coffee houses because the same flavored syrups used in flavored coffee drinks are used in making italian and french sodas. The two most common brands of syrups I see at coffee houses are DaVinci and Torani. A limited selection of Torani syrups can be purchased at many grocery stores in the coffee and tea aisle. It can also be purchased at Cost Plus World Market. I have a few different flavors in my pantry. I like to add the caramel or the vanilla to my coffee.

I used about 1 to 2 ounces of raspberry Torani syrup to a glass of ice and club soda.
Add a splash of half and half and now it is a french soda.

Wednesday, April 15, 2009

Buttercup Squash Gnocchi


When the vegetarian little sister was in town, I made this delicious buttercup squash gnocchi for lunch. This is a time consuming dish to make but it is well worth it. There is something about brown butter that goes so well with winter squash. I even have a brown butter butternut squash soup recipe that has made it into one of my coworker's recipe collection.

I chose buttercup squash instead of butternut for this recipe since buttercup has a moisture content closer to potatoes. Butternut squash has too much liquid. It can be used but the excess liquid must be squeezed or cooked out. The excess liquid will require more flour and more flour means tough gnocchi instead of soft pillows.

What is buttercup squash? It is the green squat squash usually sold with the butternut and acorn squashes. It looks almost identical to Japanese kabocha squash. Kabocha can be used but is a little harder to find in the grocery store.

2 buttercup squash
3 yukon gold potatoes
2 eggs
unbleached flour
sea salt
fresh ground pepper
1 pound crimini mushrooms, sliced
butter, as needed
fresh sage, use only leaves and slice
1 butternut squash, peeled and cubed (optional)

1. Cut buttercup squash in half. Place cut side down on baking sheet. Place potatoes on the same baking sheet. Bake in 350 degree oven until tender.
2. Let both squash and potatoes cool slightly and then run through a ricer or food mill. After ricing, cool completely.
3. Mix in two eggs and season with salt & pepper.
4. Mix in flour, a little at a time until the dough holds together. The goal is to use as little flour as possible. Refrigerate dough for at least one hour or overnight.
5. On a floured surface, roll out dough into long rope about the diameter of your thumb. Cut into-one inch pieces and roll on the tines of fork or gnocchi board to create little ridges.
6. Bring a pot of water to boil. Salt the water. Add gnocchi to boiling water. You want to do it in batches. I think I was able to do about 2 dozen at a time. The gnocchi will cook fairly quickly and float to the top. Use a slotted spoon and remove from water. Since I was making such a large amount of gnocchi, I held the gnocchi in a warm pyrex baking pan with a little melted butter. As I removed the cooked gnocchi, I tossed them to coat with butter.

Making brown butter and frying the gnocchi:
1. Heat a saute pan over medium heat. Working in batches, add about 1/4 stick of unsalted sweet cream butter. Let the butter cook and slightly brown. Add the boiled gnocchi and sage and saute until gnocchi pieces are golden brown.
2. Repeat until all gnocchi are sauteed.
3. Add about 2 tablespoons of butter to pan and add the sliced mushrooms. Season with salt & pepper. Saute until tender. Add the mushroom mixture to the gnocchi.

The last step in optional. The sautéed cubes of butternut squash adds a different texture to the dish. I cubed some butternut squash and microwaved it until tender and then sauteed in a little butter. You can also sauté some Italian sausage to make it non-vegetarian.
Toss everything together and adjust seasoning. I lightly season at every step but I tend to under season.

Sunday, April 12, 2009

Quiche Lorraine with Spinach or Quiche Florentine with Bacon


Quiche is one of those dishes that I like make when I feel uninspired. It tastes good and it is simple to put together. It can be made with a combination of different ingredients. I’ve made quiche with leeks, shallots, Canadian bacon, capicolla ham, sausage, mushrooms, asparagus, red peppers, tomatoes, mushrooms…just about anything found in the back corners of the fridge. I find asparagus and red peppers make a stunning presentation but the Lorraine/Florentine hybrid still remains my favorite.

As I am making these quiches today I even have half a large bell pepper, a basket of criminis and a few stalks of asparagus that I need to use up but since these quiches are for me, I am sticking with bacon, onions and spinach. When I make quiche for a crowd, I tend to mix up the filings and strive for a more striking presentation.

The recipe below is for two quiches. The egg mixture may be just enough for two quiches but if you pack your quiches with filling (like I did), you may have a little leftover. For me a little extra is better than not enough. The amount is usually just right but today the bf asked me to over-fill them with bacon and cheese. The extra egg mixture is not a problem. I used it to make an extra crustless quiche.


Quiche
Yields two quiches

8-16 ounces bacon, diced (depends on how much bacon you want)
1 medium yellow onion, diced
10 large eggs
3 cups half-and-half (or a combination of milk, half-and-half and/or heavy cream)
salt (not too much since the bacon is already salty)
black pepper
pinch ground nutmeg
½ cup frozen spinach, defrosted and squeeze out excess liquid
8 ounces Gruyere cheese, grated (or any favorite cheese such as swiss or mozzarella)
2 piecrusts

Directions
Heat oven to 375° F.
Cook the bacon in a large skillet over medium heat. Discard (or save for later) all but 1 tablespoon of the rendered bacon fat. Add the onions. Cover and cook until the onions are softened, 5 to 7 minutes.
Meanwhile, whisk together the eggs, half-and-half, salt, pepper and nutmeg.
Fit the piecrusts in the quiche pans. Spread half of bacon and onion mixture on bottom of each crust. Layer spinach on top and then top with shredded cheese. Pour in egg mixture.
Bake until set, about 40 minutes. Let rest for 5 minutes. Cut into wedges and serve.

I usually bake the quiche in a pan like this but today I was a little lazy and bought frozen piecrusts in pie tins.

Egg mixture:


Rendering bacon:Bacon and onions:

Spread bacon and onion mixture on bottom:
Top with spinach:

Top with cheese:Pour egg mixture over filling:

Bake about 40 minutes at 375 degrees until set and slightly golden on top: