Showing posts with label canning and preserving. Show all posts

Saturday, February 18, 2017

Blueberry Meyer Lemon Jam for Valentine's Day


This blueberry meyer lemon jam is my favorite jam.  The first time I made it was back in December of 2014 when the associate director at my work brought in bags and bags of meyer lemons from his huge tree.  I was trying to use up the lemons so I made a few batches of blueberry meyer lemon and strawberry meyer lemon jam.  I gave most of the jam away as Christmas gifts but kept a few jars for myself.

I started using the jam to sweeten my kefir smoothies and fell in love with the citrusy floral flavor.  I used it up really quickly. Most of the time I make jam and it takes months to finish a jar.  When I started jamming, I was making several dozen jars each week as I tested different fruit and methods.

I started off making jam using the guide found on the box of pectin, moved to recipes from the Ball Blue Book Guide to Preserving, and then finally on to artisan-style jams made without added pectin. Jams made without added pectin relied on cooking the fruit with sugar until the sugar reached a certain temperature to gel the jam. The texture is amazing.

Over the years I've come to prefer a different method for each fruit.  Some fruit were finicky when it comes to jamming. I never had much luck with making low sugar strawberry jam using pectin. The strawberry chunks always floated in the syrup.  I've tried slicing, crushing, blending, and leaving them whole. My frustration grew with each batch.  I then tried making strawberry jam using the no added pectin method. The longer cook time and higher sugar content resulted in no floating pieces. Except I did not like the flavor over-cooked strawberries. I then tried making freezer strawberry jam. It's the only way I make strawberry jam now.

While strawberries are difficult to work with, blueberries are easy. They work well using the regular or low sugar pectin method. The flavor withstands the longer cooking time for no pectin added jam. I've made blueberry jam using both fresh and frozen.  Fresh when they are abundant in the summer and frozen in the middle of winter.  Blueberries work well pureed with an immersion blender, sliced in the food processor, or left whole like I usually do.

I found a few containers of old pectin in my stash.  I read that pectin doesn't expire so I decided to make low sugar jam instead of cooking the sugar to temperature for this batch.

Use a non reactive pot for the jam. I like making jam in my enamaled french ovens.  I'm using my trusty 5.5 quart that I bought when Williams Sonoma had the Cherry color on sale for $119. Sometimes I use the smaller or larger sizes but the 5.5 quart round is my most versatile and lives inside while the others are stored in the garage.


Blueberry Meyer Lemon Jam:

10 cups blueberries
4 1/2 cups sugar
3 tablespoons low sugar pectin
1 teaspoon citric acid
2 meyer lemons
1/4 cup Grand Marnier (optional)

1. Mix pectin with 1/2 cup sugar and citric. I used Zulka brand sugar this time and didn't have any problems. It's cane sugar. Awhile back I read to only use C&H brand cane sugar. Some people have issues with their jams not setting when they use a store brand.  Growing up in California, most sugar on the the market is cane and not beet sugar.


2. Remove seeds and then grate the meyer lemons. I used the entire lemon including rind and pith.


3. Add lemons to the blueberry, pectin, and sugar mixture.

4. Bring the blueberries to a rolling boil that cannot be stirred down. I usually like to smash some of the blueberries while keeping most of them whole.

5. Add 4 cups sugar and Grand Marnier. Return to rolling boil and cook one minute.

6. Test for gel by either using a cold spoon or plate that has been placed in freezer.  After making a few batches of jam you will be able to tell if your jam will gel by looking at the consistency of the jam.


7. Ladle into sterilized jars. A canning funnel makes it easier (less messy). I must like canning funnels because I found three in my drawer.  I couldn't find the bubble remover or magnetic lid tool though.

8. Process ten minutes in water bath canner.  


I bought a different inset for my canner. The one that came with the canner had grooves for quart jars. I prefer 8 ounce jars. Pints are a little too big for jam and 4 ounces holds about two servings worth of jam. I love the way Weck jars look but the sizes are a little strange to me and those clips are not very practical.  After I open a jar of jam, I replace the two-piece lid/ring with a plastic twist-off cap.

I turn off the heat, lift the entire rack out of the water, and let the jars cool.  When I am making more than one batch, a jar lifter is very handy to get the hot jars out of the pot.  I usually lift them out of the pot and onto a heavy duty sheet pan to transport them to their cooling spot. Since I was only making one batch, I simply let the jars cool on the rack.  I don't believe I even took the lid off or lift them out of the water after I turned off the heat.  I left them in the pot for a little while.  It must be habit.  In Denver, I always processed my jars for 20-30 minutes instead of 10 minutes.

 I tested it out on a slice of toasted sourdough bread.

I don't believe I took a picture of the jams after I labeled the jars.  I took a screenshot of the PDFs. (At the beginning of this post.) It's basically the same labels I've used for years.  I changed the text from "from malisa's kitchen" to "happy valentine's day" since I was giving them to my team for Valentine's day. The rectangular label goes around the jar and the round label goes on lid.  

I also made chocolate drizzled pretzel rods.  I didn't dip the pretzels.  I just put them on a silicone sheet and drizzled melted chocolate on them. The Ghirardelli melting wafers are delicious. I used the leftover chocolate to make pudding and I the pudding was better with Ghirardelli than Scharffen Berger.




Wednesday, January 02, 2013

Som Moo (Naem or Sour Pork Sausage)


I called my mom on Christmas Day.  I was on my way to the Asian grocery store.  She's coming to Denver in a few days and usually brings me goodies.  She was just in town over the Thanksgiving weekend and brought rambutans, guavas, seaweed, mangosteen, and other goodies.  When J* was in San Diego a few weeks ago she sent him back with a large bag of guavas for me and a bag of snickers for his plane ride.  While we were talking, my mom said that our Lao sausage guy passed away a few days ago.

He's the guy that we always got our sai krok and som moo from.  I didn't eat beef or pork for a long time.  I started eating pork but only in certain forms (when the flavor is hidden enough that it no longer tastes like pork).  I always brought back a few packages of sai krok and som moo.  The sai krok is the best I've ever had.  It's sour, garlicky, and lemongrass-y.  (Maybe I'll attempt making sai krok and lap cheong when I feel like dealing with the casings.) I never eat som moo by itself but I keep it around for nam khao.

One of my favorite Laotian dishes is nam khao.  A few years ago I was looking for a recipe on the net and I couldn't find one so I came up with something based solely on my memory of eating it. I've been told that my recipe is missing the red curry paste.  I think it tastes fine without.  One of the key ingredients for nam khao is som moo.  Now that my sausage guy has passed away, I must come up with a way to make my own or else settle for American ham doused with lime juice.

I looked at a few recipes.  I love the directions on the Lao Cook website so I followed the instructions but went with the seasoning recipe from Thai Food Master because he included sugar and MSG.  I made two batches -- one using just sticky rice and another using the nam powder I thought I used nam powder but I guess I threw away the actual sodium nitrite packet mistaking it for one of those oxygen absorber packets.

Please visit the Lao Cook and Thai Food Master websites for a recipe.

I started off with some pork. I bought these from the Asian store.  In hindsight I should I have bought a leaner pork loin and the frozen pork skin instead.

I trimmed the meat, saving the ski.  I boiled the skin and sliced them up.

I ground the meat user the grinder attachment on my Kitchenaid.  While I don't feel that it's the best meat grinder, it works for occasional meat grinding.  I had to cut the meat into small pieces to get it to fit the chute.  I bought my mom a stand alone meat grinder and took it with me to San Diego. It was surprisingly difficult to find a meat grinder in San Diego but almost every store in Denver carries it.  (Excuse the mess.  I was working on a few different cooking projects.)

I kneaded the meat using the dough hook of my Kitchenaid.  This can be done by hand but it takes a long time.

After kneading, I divided the meat into two batches.  The one below has the sticky rice.  (I didn't think I had enough pork skin but it was perfectly fine.  I should have trimmed off more of the fat.) I finished the kneading by hand after I mixed in the ingredients and the pork skin.

I wrapped the batches differently.  The one without the rice were wrapped smaller and has the chili on the outside.  The one with the rice were wrapped larger (I was a little tired by this time) and had chili in the middle (like how Lao Cook does it).

I ate the sausages (even the batch without the rice or the sodium nitrite) and I survived.

Wednesday, November 17, 2010

Apple Pie Filling


Be prepared for a series of posts about my adventures in canning. I've spent the summer and part of fall learning about water bath canning.

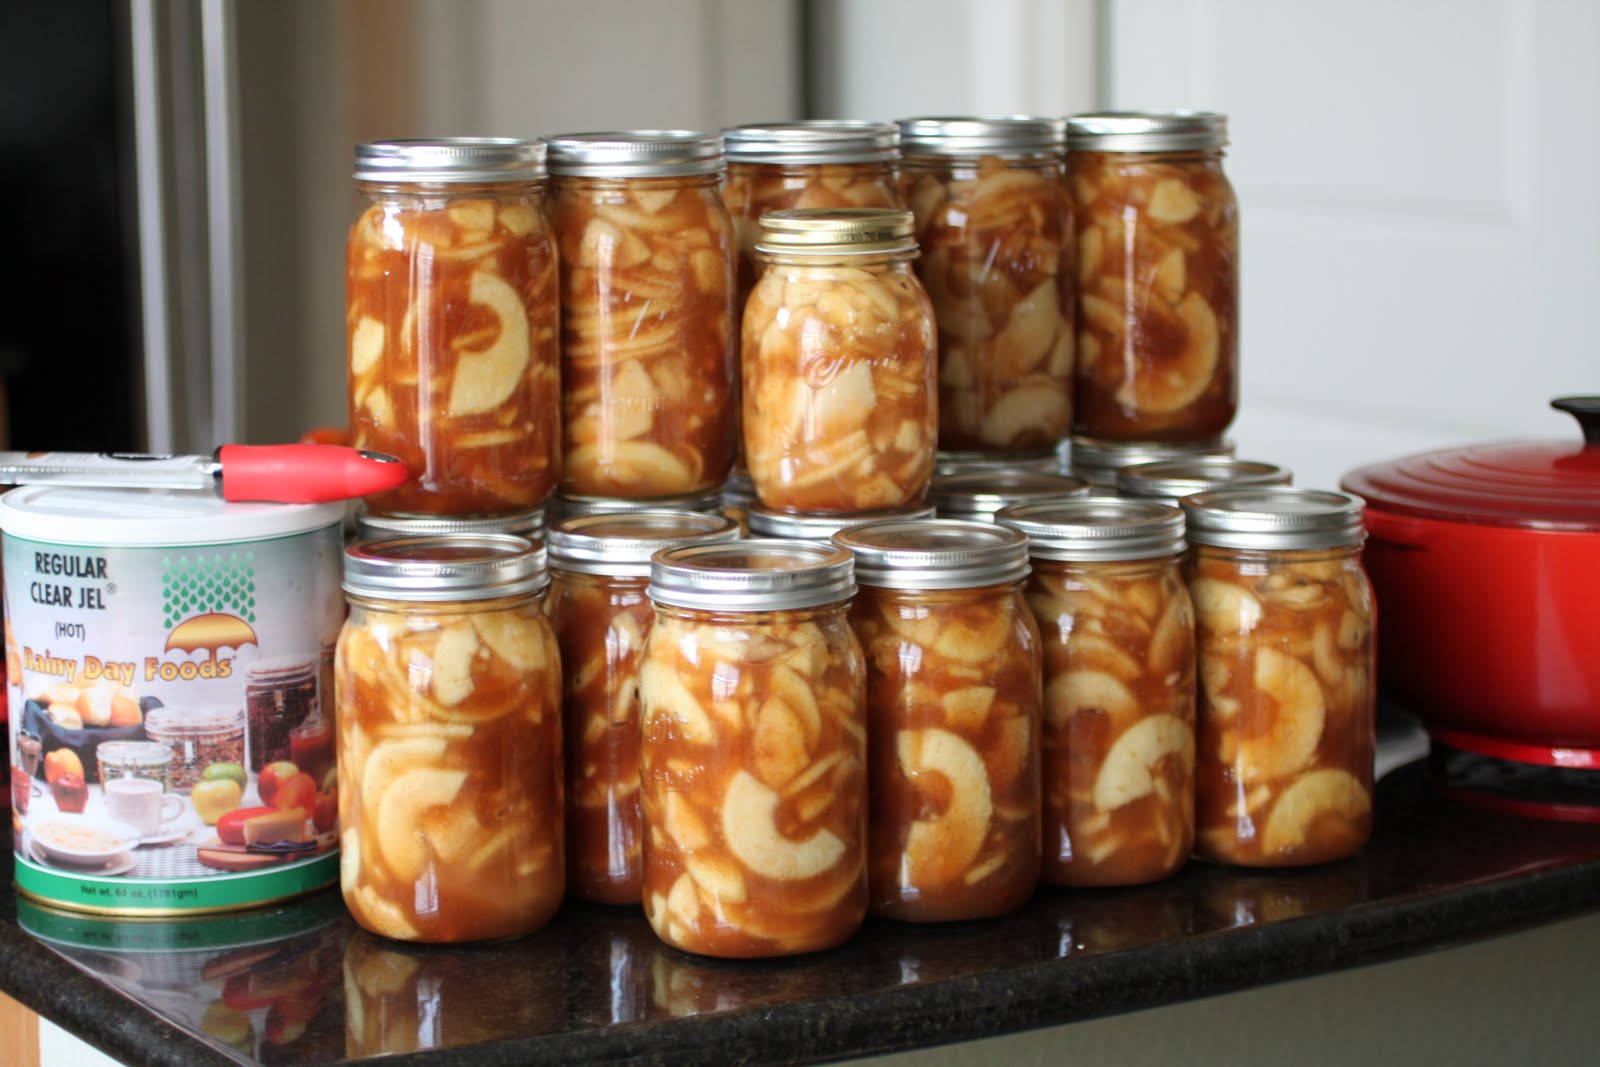
One of my coworkers had an abundance of apples so after spending a weekend making apple butter and apple jelly, she left me a box of apples for pie filling. After doing some research, I discovered that I needed something called ClearJel in order to safely can the apples. ClearJel is difficult to find in stores so I ordered it.

My order took longer than expected to ship. By the time I got the Clear Jel, the apples from my coworker were pretty mealy so I abandoned the whole canning pie filling idea and made apple sauce instead. It was a great idea because the apples were perfect for apple sauce. I used some for pie and the flavor was too one dimensional. I prefer apple pie made with a combination of different types of apples.

After making apple sauce, I went out and bought apples for the pie filling. I used the trusty Granny Smiths and combined them with some Braeburns and Jonathans. I wished we had Gravenstein, Spy, Macoun, and other great pie apples out here but we don't so I had to make do. We do get Honey Crisps and Pink Lady apples but those are my eating fresh varieties.

Here are the apples from my coworker. I don't know the name of these apples but I assume they're probably a variety that does well in Colorado.


I used one of those nifty apple peeler/slicer/corer thingamajig to save time. I wish I was able to adjust the thickness of the slices because I wanted them to be a little thicker.


The peels and cores from when I made apple sauce and when I made apple pie filling. I boiled them down and made pectin. The first batch with the mealy apples made a poor pectin.


This recipe uses a product called Clear Jel sold under the brand name ClearJel. Clear Jel is a modified corn starch and is the only USDA recommended thickener for canned pie fillings.

Clear Jel is used in almost all commercially prepared fruit pie fillings and used by many home canners who care about safe canning. I’m a safe canner. (I’m HACCP certified. It was part of the food safety and sanitation class we were required to take.) I know many people swear that they have been using the same recipe for 30 years without any ill effects. But I don’t want to be the person who poisoned or killed a friend or family member with strawberry jam.

The reason why it is not safe to use regular cornstarch or tapioca starch is because the thickeners thicken the product while it is being heat processed and therefore inhibiting the product from reaching the correct temp to kill the bacteria. I never cared for cornstarch as a thickener because to me, it is considered an inferior thickener. It produces clear sauces that break down with prolonged (ten minutes) heating. That’s why gravies separate and become watery when reheated. Tapioca and arrowroot are better thickeners but also not safe for canning.

I pretty much followed the recipe on this website. I think they know a thing or two about canning. http://www.pickyourown.org/applepiefilling.htm

The only thing I did differently was use all water instead of apple juice and used a baking spice mix from my local spice shop supplemented with some freshly grated nutmeg instead of the list of spices they used. I also tripled the amount so instead of the 7 quarts, I got about 20 quarts and one half liter. (I'm mixing quarts and liters because I used a Bormioli Rocco Quattro Staglioni jar because I didn't have enough apples to fill a full quart.)

Canned Apple Pie Filling:
5 gallons of peeled, cored and sliced apples (use a variety of apples)
9 cups sugar
6 tablespoons baking spice mix
freshly grated nutmeg
22.5 cups water (just over 5 and a half quarts)
4 cups Clear Jel (I used slightly less because I didn't want the filling to be too thick)
1 1/2 cups bottled lemon juice (use more or less depending on the tartness of your apples)

1. Wash and sterilize jars.
2. Prep apples by washing, peeling, coring, and slicing. Soak apples in a mixture of water and citric acid or lemon juice.
3. Blanch apples in batches for about one minute. Reserve blanching water and use for making your filling liquid.
4. Make the filling liquid by combing water, sugar, spices. Heat the liquid. When it comes to a boil, combine Clear Jel with lemon juice to make a slurry. Add the slurry to the boiling liquid. Boil one minute and remove from heat.
5. Fill the sterilized jars by alternating layers of apples and liquid. (I tried filling with apples and then with liquid. It doesn't work. The liquid is thick enough that it doesn't really seep nicely.) Pack the jars tighly with apples. Who wants a mostly thickened liquid pie? Leave about half an inch to and inch of space. There will be some expansion while processing. Remove air bubbles. Clean rims (and in my case outsides of jars) and place lids and bands.
6. Process in a water bath for 25 minutes. (I processed for an additional 10 minutes because I live 5,280 feet above sea level.)

What I learned:

- Triple batch of apple pie filling takes a long time and should not be tackled on a school (work) night. I was up until 1 AM and making pie filling and baking two cakes for class.

- Wide mouth jars are my friend.

- Italian canning jars are strange, especially when you fll them too much. The lid almost exploded off. It was nicely rounded when I took it out of the canner. I thought I would have to use the jar right away because there was no way it would properly seal. I woke up in the morning and the lid was nicely flat and sucked back in and it sealed. Yay!

- Large quart size jars probably will not all seal right away like little pints and half pints. I went to bed thinking that after canning over a hundred jars of jam, this was my first batch with less than 100% sealing success rate. (The unsealed jars were Kerr brand. All of the Ball jars sealed within half an hour.) I woke up in the morning and the two remaining jars were sealed. Yay for maintaing a 100% sealing success rate!

I think the jars of apple pie filling are just gorgeous. The apple slices are nicely suspended in the Clear Jel -- No floating apple pieces above a layer of sauce. The Clear Jel is supposed to last indefinitely so I have a number 10 can of it plus a smaller can of instant Clear Jel. I'm excited to try a fresh strawberry pie using instant Clear Jel.


Saturday, June 19, 2010

Apple Butter


I can’t remember the last time I made apple butter but it came to mind when we had an abundance of apples at work. We just had our annual team building event and my boss bought tons of apples for one of the challenges. We tried our best to eat the apples but there were still several left at the end of the week. Everyone preferred the Fuji over the Red Delicious so I took a sack of Red Delicious home with me.

Red Delicious apples are not ideal for apple sauce or butter. (But in my opinion, they are not ideal for eating either.) I had a few Fuji apples in my fridge so I added them to the batch to add more flavor.

Friday, September 25, 2009

Freezer Pesto (Harvesting and Preserving Summer Basil)

It has been really cold the last few days. We were at the baseball game on Tuesday and Thursday and it was about 42 degrees out. I figured it was time to harvest the leaves and cut the plants back. I will try to grow the pruned basil plants indoors but I'm not holding my breath.

I really love the taste of fresh basil. There is no really perfect way to preserve the flavor of fresh basil. I use a lot of dried herbs but basil is not one of them. I've tried freezing whole basil leaves but was never really satisfied with the results. The best way I found to preserve the basil flavor is to make it into a pesto but minus the cheese.


I'm using an 11 cup food processor. This batch is sweet basil. I added three cloves of garlic and a handful of toasted pine nuts.

Pulse it a few times and then add a drizzle of olive oil. Pulse some more to combine.

Transfer into freezer containers or ice cube trays. I've done the ice cube method but I find it too messy. Frozen pesto is usually still soft enough that I can spoon out whatever I need. Top the pesto with more olive oil.

I made another batch using Thai basil.

I grew three types of basil (sweet, lemon and Thai) this year. I only grew one of each type because we can never eat the basil fast enough.