Showing posts with label dessert. Show all posts

Thursday, October 24, 2013

Golden Vanilla Cake


It's been a long while since I last posted.  During my absence, I moved from the Mile High City to America's Finest City (aka my hometown).  I look forward to baking without having to adjust for altitude. Today I'm testing out a yellow cake recipe.

I've been searching for the perfect homemade yellow cake and have tried several recipes over the last few years. I've been disappointed each time.  My last attempt went into the trash.  I'm not looking for a fluffy boxed cake mix cake.  Cakes from mixes are too gummy in texture and artificial tasting for me.

I'm looking for a dense cake but I don't want dry or crumbly and many of the recipes I've tried resulted in a dense, dry, and crumbly.  I want dense but also moist with a fine crumb.  It is the texture found in many bakery cakes.

Bakeries use the high ratio method that utilize special high ratio flours and shortening. The problem with high ratio cakes are they tend to be too sweet and lack flavor.  This is because high ratio cakes are made with a lot of sugar and a special high ratio shortening containing emulsifiers. To top it all off, they are then frosted with shortening "butter"cream. So is there a way to get the results of a high ratio cake without using special flours and shortening? 

I came across this recipe on the King Arthur website.  I think I looked at this recipe a while back but decided to not make it because of the many negative reviews.  But after reading through the several pages of reviews, I found that people were either very happy or very disappointed by the results.  I decided to give it a try.  I've had a lot of luck with King Arthur recipes. 

This recipe from King Arthur utilizes the reverse creaming method used in high ratio cakes but subs butter for the high ratio shortening.  The result is a very flavorful butter cake with a very fine crumb.  The cake is still pretty sweet so I frosted it with a not too sweet chocolate cream cheese frosting.  The only reason I frost cakes is because everyone expects them to be frosted. I don't like frosting and find it a waste of calories.  I would rather eat a larger piece of cake than eat the frosting.

I love the texture and flavor of this cake but it is very sweet and the texture while very good, reminded me of pound cake.  I think I will have to tinker with it a bit.  Perhaps make it with cake flour instead of all purpose and decrease some of the sugar. 

The recipe can be found on the King Arthur website:
http://www.kingarthurflour.com/recipes/golden-vanilla-cake-recipe

The recipe makes:

One 9x13 pan
Two 9" rounds
Three 8" rounds
Twenty four cupcakes


Golden Vanilla Cake

2 cups sugar, preferable baker's sugar (which is a finer than regular granulated sugar)
3 1/4 cups unbleached all purpose flour
2 1/2 teaspoons baking powder

1 teaspoon salt
3/4 cup unsalted butter, cubed and at room temperature
1 1/4 cups milk, at room temperature
2 teaspoons vanilla extract

4 large eggs

1. Bring butter, milk, and eggs to room temperature.

2. Preheat oven to 350 degrees. Line pans with parchment paper.

3. In the bowl of a stand mixer, measure out sugar, flour, baking powder and salt.  Using the paddle attachment, mix until combined.


4. Add the butter and mix on low until mixture looks sandy.  (It should look like bisquick or cake mix.)


5.  Combine the milk and vanilla and add to flour mixture.  Mix on low speed 30 seconds and increase to medium and mix another 30 seconds.


6. Add egg one at a time mixing on medium for 30 seconds after each addition.


7. After the last egg, scrape down bowl and mix another 30 seconds.


8. Transfer batter into baking pans.  Drop pans on counter a few times to release air bubbles.  Bake until golden and toothpick inserted comes out clean.  (I didn't read the instructions carefully and baked the batter in two 8" pans instead of three.)


Sunday, June 24, 2012

Gluten Free Thai-Style Coconut Waffles

I'm back...sort of.  The wedding is over but I'm still busy with post-wedding projects and baby shower planning.  I co-hosted a shower about a month before my wedding, just got done with sis-in-law's shower (I did not host but did help out), and have another baby shower in a few weeks.  My mom came out to Denver with me on June 4.  She leaves in a few days so I have a few weeks before I fly back to San Diego again.  2012 has been a busy year filled with many significant life events for everyone around me.  I'm so excited for everyone!!  So in the meantime, I will be blogging from time to time using photos taken with an iPhone instead of a real camera.

I had a coconut sitting on my kitchen counter so my mom (she's visiting), decided to make coconut waffles.  These waffles (like many Asian desserts) are gluten free because they're made with rice flour instead of wheat flour.  The rice flour gives the waffles a very different texture.  They're light, crispy on the outside and soft and slightly chewy on the inside.  Mom said she tried using half rice flour and half wheat flour and it didn't taste very good.  She said my dad kept on commenting on how it wasn't very good after she repeatedly tried serving the same batch to him.  She eventually tossed them.

The measurements used are very unusual but it is the usual way I get recipes from my mom or grandmother.  I usually convert many of these recipes to conventional measurements but I like the novelty of using the coconut milk can as the measuring "cup." This recipe also makes enough batter to feed a crowd.  I made a third this time around and still ended up with about ten very large waffles.  We took the batter (the one with 3 bags of flour) over to my aunt's house with a waffle iron in tow and we actually ended up mixing up another batch while there and I ended up writing the recipe down for everyone.  They're that good.

The waffles can easily be made into Pandan Coconut Waffles with the addition of pandan extract.  To use fresh (frozen) pandan leaves, substitute some of the water in the recipe with the water from extracting the pandan leaves.  An easier (but not as tasty) method is to use bottled pandan extract usually sold pre-mixed with green food coloring.

Gluten Free Thai-Style Coconut Waffles

3 16 ounce bags of glutinous rice flour (or as I call it, the green bag)
1 19 ounce can Mae Ploy brand coconut milk
1 19 ounce can granulated sugar
7 large eggs
pinch salt
half a grated coconut*
1/2 teaspoon baking powder (mom doesn't usually use this but this was my addition and mom even admitted that it improved the look of the waffles)
2 19 ounce cans of water (don't use the entire 2 cans. start off with 1.5 cans and add more to make a thick but loose batter)
drop of yellow food coloring gel (optional but it gives the waffles a nice golden color)

Mix all ingredients and let sit 30 minutes or overnight.  Cook waffles according to waffle iron instructions.  I'm using an extra deep Belgian waffle iron from Waring Pro.

*Frozen grated coconut can be substituted but the shreds are a little finer.  These waffles are traditionally made with larger pieces of hand shredded coconut.  I used a fresh coconut but I coarsely chopped up in the food processor.  


Wednesday, November 17, 2010

Apple Pie Filling


Be prepared for a series of posts about my adventures in canning. I've spent the summer and part of fall learning about water bath canning.

One of my coworkers had an abundance of apples so after spending a weekend making apple butter and apple jelly, she left me a box of apples for pie filling. After doing some research, I discovered that I needed something called ClearJel in order to safely can the apples. ClearJel is difficult to find in stores so I ordered it.

My order took longer than expected to ship. By the time I got the Clear Jel, the apples from my coworker were pretty mealy so I abandoned the whole canning pie filling idea and made apple sauce instead. It was a great idea because the apples were perfect for apple sauce. I used some for pie and the flavor was too one dimensional. I prefer apple pie made with a combination of different types of apples.

After making apple sauce, I went out and bought apples for the pie filling. I used the trusty Granny Smiths and combined them with some Braeburns and Jonathans. I wished we had Gravenstein, Spy, Macoun, and other great pie apples out here but we don't so I had to make do. We do get Honey Crisps and Pink Lady apples but those are my eating fresh varieties.

Here are the apples from my coworker. I don't know the name of these apples but I assume they're probably a variety that does well in Colorado.


I used one of those nifty apple peeler/slicer/corer thingamajig to save time. I wish I was able to adjust the thickness of the slices because I wanted them to be a little thicker.


The peels and cores from when I made apple sauce and when I made apple pie filling. I boiled them down and made pectin. The first batch with the mealy apples made a poor pectin.


This recipe uses a product called Clear Jel sold under the brand name ClearJel. Clear Jel is a modified corn starch and is the only USDA recommended thickener for canned pie fillings.

Clear Jel is used in almost all commercially prepared fruit pie fillings and used by many home canners who care about safe canning. I’m a safe canner. (I’m HACCP certified. It was part of the food safety and sanitation class we were required to take.) I know many people swear that they have been using the same recipe for 30 years without any ill effects. But I don’t want to be the person who poisoned or killed a friend or family member with strawberry jam.

The reason why it is not safe to use regular cornstarch or tapioca starch is because the thickeners thicken the product while it is being heat processed and therefore inhibiting the product from reaching the correct temp to kill the bacteria. I never cared for cornstarch as a thickener because to me, it is considered an inferior thickener. It produces clear sauces that break down with prolonged (ten minutes) heating. That’s why gravies separate and become watery when reheated. Tapioca and arrowroot are better thickeners but also not safe for canning.

I pretty much followed the recipe on this website. I think they know a thing or two about canning. http://www.pickyourown.org/applepiefilling.htm

The only thing I did differently was use all water instead of apple juice and used a baking spice mix from my local spice shop supplemented with some freshly grated nutmeg instead of the list of spices they used. I also tripled the amount so instead of the 7 quarts, I got about 20 quarts and one half liter. (I'm mixing quarts and liters because I used a Bormioli Rocco Quattro Staglioni jar because I didn't have enough apples to fill a full quart.)

Canned Apple Pie Filling:
5 gallons of peeled, cored and sliced apples (use a variety of apples)
9 cups sugar
6 tablespoons baking spice mix
freshly grated nutmeg
22.5 cups water (just over 5 and a half quarts)
4 cups Clear Jel (I used slightly less because I didn't want the filling to be too thick)
1 1/2 cups bottled lemon juice (use more or less depending on the tartness of your apples)

1. Wash and sterilize jars.
2. Prep apples by washing, peeling, coring, and slicing. Soak apples in a mixture of water and citric acid or lemon juice.
3. Blanch apples in batches for about one minute. Reserve blanching water and use for making your filling liquid.
4. Make the filling liquid by combing water, sugar, spices. Heat the liquid. When it comes to a boil, combine Clear Jel with lemon juice to make a slurry. Add the slurry to the boiling liquid. Boil one minute and remove from heat.
5. Fill the sterilized jars by alternating layers of apples and liquid. (I tried filling with apples and then with liquid. It doesn't work. The liquid is thick enough that it doesn't really seep nicely.) Pack the jars tighly with apples. Who wants a mostly thickened liquid pie? Leave about half an inch to and inch of space. There will be some expansion while processing. Remove air bubbles. Clean rims (and in my case outsides of jars) and place lids and bands.
6. Process in a water bath for 25 minutes. (I processed for an additional 10 minutes because I live 5,280 feet above sea level.)

What I learned:

- Triple batch of apple pie filling takes a long time and should not be tackled on a school (work) night. I was up until 1 AM and making pie filling and baking two cakes for class.

- Wide mouth jars are my friend.

- Italian canning jars are strange, especially when you fll them too much. The lid almost exploded off. It was nicely rounded when I took it out of the canner. I thought I would have to use the jar right away because there was no way it would properly seal. I woke up in the morning and the lid was nicely flat and sucked back in and it sealed. Yay!

- Large quart size jars probably will not all seal right away like little pints and half pints. I went to bed thinking that after canning over a hundred jars of jam, this was my first batch with less than 100% sealing success rate. (The unsealed jars were Kerr brand. All of the Ball jars sealed within half an hour.) I woke up in the morning and the two remaining jars were sealed. Yay for maintaing a 100% sealing success rate!

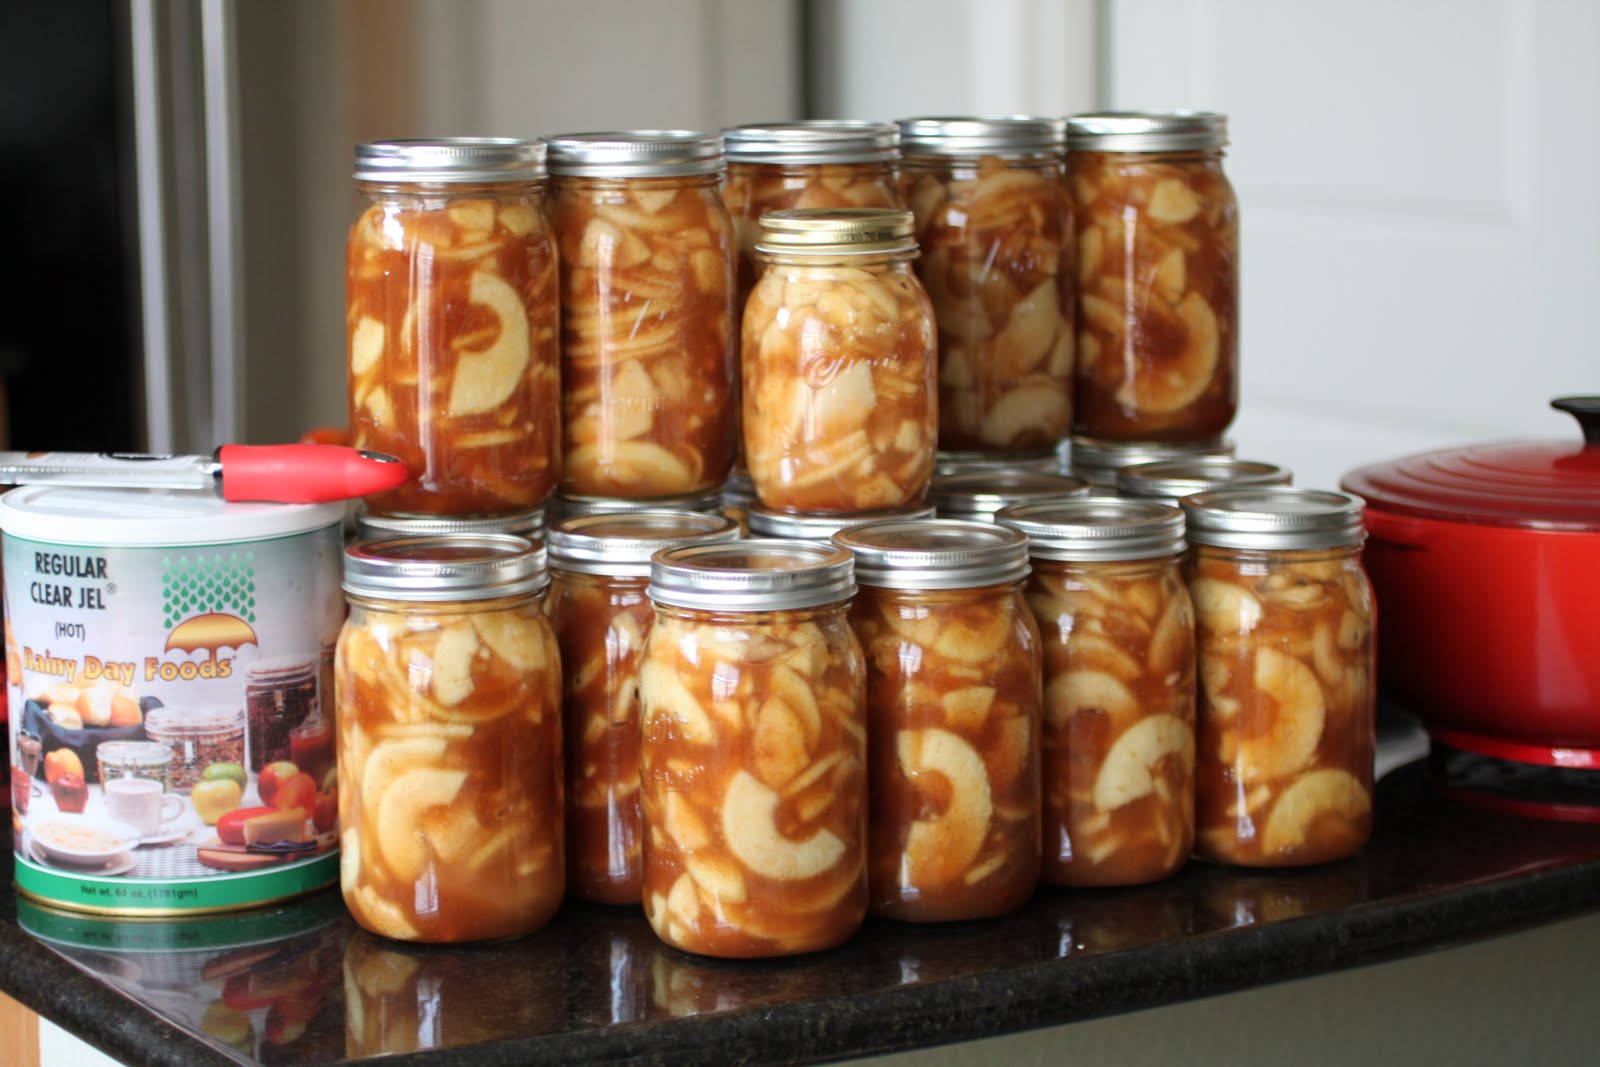
I think the jars of apple pie filling are just gorgeous. The apple slices are nicely suspended in the Clear Jel -- No floating apple pieces above a layer of sauce. The Clear Jel is supposed to last indefinitely so I have a number 10 can of it plus a smaller can of instant Clear Jel. I'm excited to try a fresh strawberry pie using instant Clear Jel.


Cake Classes

I completed my second cake class a few weeks ago. (Actually, I didn't make it to the last class because I came down with a respiratory infection.) I took the first class at a specialty cake supply store but decided that $80 was a bit too much for a cake decorating class. The second course, the fondant and gum paste course, was $20 at Hobby Lobby.

A few cakes from my the first course: Decorating Basics.

This one was the cake we had to bake for the second class. We were supposed to learn about torting, icing and some basic piping. The icing we used was a special recipe that the instructor came up with. She called it Helen's "buttercream" for fondant look cakes. The icing tastes like Crisco and powdered sugar but does create a very smooth icing that mimics the smooth look of fondant. I'm not posting pictures of the cupcakes for the third class. We learned shaggy mums and were supposed to decorate the cupcakes with them. I thought they looked like cousin It.


This was the final cake. I made the roses the weekend before class using royal icing. I made over 50 roses that weekend for practice. When I showed up to class, the instructor watched me make my roses and said I did them the wrong way. I was supposed to go counter-clockwise instead of clockwise. Well...after 50+ roses done the wrong way, my brain cannot be re-trained to do them the correct way. (This cake sat on my counter for about five days before I took the picture. The icing does not rot or melt. Gross!)


The shell border that we learned in class.


Cake for the Fondant & Gum Paste Course:

And this cake was for my fondant and gum paste course. We only had to bake one cake for the last class. Weeks 1 through 3 were all about learning to make the various gum paste flowers and designs. I made the cake, covered it with fondant and then stuck all the flowers in place. My plan was to give it the finishing touches in class. I got sick so I sent the cake to class with my friend. She finished it with a rope border and covered up the fondant cracks with cut outs using the calyx cutter. (She took the two photos below and posted them of facebook. I never actually got to see the cake because it was served to my coworkers.)


It took about two weeks to complete all the flowers. I didn't work on them each night. (I had to take a break when I sliced my thumb with my Asian vegetable peeler.) I spent about an hour or two each night making the flowers. I made a total of 25 mums and averaged about 5 mums per night. Some nights were spent making and coloring the gum paste and fondant.

It took a lot of tools. I took over the kitchen table. I covered it with a vinyl tablecloth and had tools everywhere.


Some Recipes:

Buttercream for Fondant Look Cakes
2 pounds powdered sugar
4 Tablespoons meringue powder
1 teaspoon popcorn salt
1 cup Crisco shortening
1/3 to ½ cup water (lukewarm)
2 teaspoons vanilla or flavoring of your choice

Combine powdered sugar, meringue powder and salt together. Add remaining ingredients and mix at low to medium speed until smooth. Enjoy!

Royal Icing for Piping
(Stiff consistency)
yield: 3 cups

3 level tablespoons Meringue Powder
1 lb. icing sugar
5 tablespoons lukewarm water

Make sure all utensils are grease free (containers to store the icing, too!)

Place icing sugar and Meringue Powder in a bowl. Stir or mix at low speed until blended. Add water and mix 7 to 10 minutes at low-medium speed until icing loses its sheen. To prevent drying, be sure to cover the bowl with a damp cloth while working with icing.

Store in an airtight grease-free container (stainless steel bowls with airtight lid are ideal) for up to 2 weeks (room temperature). To reuse, beat on low to restore original texture.

Classic Rolled Fondant
yield: 2 lb.
1 tablespoon unflavored gelatin
1/4 cup cold water* * or, 3 tablespoons cold water, and
1/2 cup Glucose* * 1/2 cup light corn syrup
1 tablespoon Glycerin
2 tablespoons solid vegetable shortening
2 lbs. Icing sugar
2 to 3 drops liquid food colour and flavoring, as desired

• Combine gelatin and cold water; let stand until thick.
• Place gelatin mixture in top of double boiler and heat until dissolved.
• Add glucose and glycerin, mix well.
• Stir in shortening and just before completely melted, remove from heat, add flavoring and colour.
• Mixture should cool until lukewarm.
• Next, place 1 lb. Icing sugar in a bowl and make a well.
• Pour the lukewarm gelatin mixture into the well and stir with a wooden spoon, mixing in sugar and adding more, a little at a time, until stickiness disappears.
• Knead in remaining sugar.
• Knead until the fondant is smooth, pliable and does not stick to hands.
• If fondant is too soft, add more sugar; if too stiff, add water (a drop at a time).
• Use fondant immediately, or follow the direction for storing rolled fondant.

Storing Rolled Fondant:
Rolled Fondant dries out very quickly, so keep it covered and store properly and promptly.
If stored properly (and promptly), it will keep up to 1 month R room temperature.

1. Roll it into smooth ball, disc, or log shape.
2. Coat it with solid white vegetable shortening.
3. Wrap with plastic food storage wrap (microwaveable), twice.
4. Wrap with aluminium foil.
5. If freezing, put it in a resealable plastic food storage bag or airtight container.

Gum Paste
This recipe is the one on the back of the Wilton can of Gum-Tex (with minor modifications to make life easier). The texture of is really nice. I like to mix the gum paste with equal parts fondant when making flowers or bows.

1 tablespoon Wilton Gum-Tex
4 cups (1 pound) sifted powdered sugar
1 heaping tablesspoon Glucose or light corn syrup
4 tablespoons warm water

In a large bowl, combine Gum-Tex with 3 cups of powdered sugar. Make a well in the center and set aside. Combine water and glucose in a glass measuring cup. Heat in microwave on high for about 30 seconds. until mixture is clear. Pour into well of sugar and mix until well blended. Slowly knead in the last cup of powdered sugar.

Wrap with plastic wrap and place in airtight container. Allow gum paste to rest at least 8 hours. Keep well wrapped. Knead in shortening to keep gum paste soft and pliable.

Tuesday, September 28, 2010

Barefoot Contessa's Chocolate Cupcakes (Altitude Adjusted) with Swiss Meringue Buttercream


I haven't been posting much lately. September has been a crazy month. I've been out of town three times in the last month. I hate airports =(

The recipe below is the result of about two and a half months of experimenting. I've been tinkering with this since July. The last batch I made was on September 18. I'm finally satisfied with the results. I'll probably try it as a cake this coming weekend and use it for my final project for my final cake decorating class. (Don't tell the instructor that I'm not using her doctored cake mix recipe.)

It is my favorite cupcake recipe at the moment. Cake recipes with buttermilk always give me the most trouble but I was able to make it work. The texture is not quite as pudding-like as the original recipe but it makes beautiful slightly domed cupcakes. Top it with swiss meringue buttercream and it is cupcake heaven.

Barefoot Contessa Chocolate Cupcake (Adjusted for Altitude)

Ingredients:
2 ½ cups minus 1 tablespoon all-purpose flour
1 ¾ cups sugar
¾ cups dutch cocoa powder (Valrhona, Guittard Cocoa Rouge or Droste)
2 teaspoons baking soda
scant teaspoon baking powder
scant teaspoon kosher salt
1 cup buttermilk, shaken
½ cup vegetable oil
2 extra-large eggs, at room temperature
1 teaspoon vanilla
¾ cup freshly brewed hot coffee

Directions:

Preheat the oven to 350 degrees F. Line cupcake tins with paper liners. Fill each well halfway with batter. Makes approximately 36 cupcakes.

Sift the flour, sugar, cocoa, baking soda, baking powder, and salt into the bowl of an electric mixer fitted with a paddle attachment and mix on low speed until combined. In another bowl, combine the buttermilk, oil, eggs, and vanilla. With the mixer on low speed, slowly add the wet ingredients to the dry. With mixer still on low, add the coffee and stir just to combine, scraping the bottom of the bowl with a rubber spatula. Pour the batter into the prepared pans and bake for 20 to 30 minutes, until a cake tester comes out clean.


Swiss Meringue Buttercream for Cupcakes


Makes about 9 cups, enough for about 28 cupcakes (The recipe says 28 cupcakes but I was able to frost all 36 cupcakes with extra. Maybe I'm a little stingy with my frosting.)

Ingredients:
  • 2 1/2 cups sugar
  • 10 large egg whites
  • 4 cups (8 sticks or 2 pounds) unsalted butter, cut into pieces
  • 2 teaspoons pure vanilla extract
Directions:
  • Place sugar and egg whites in the heat-proof bowl of an electric mixer. Set bowl over a pan of gently simmering water, and whisk until sugar has dissolved and egg whites are hot to the touch, about 3 minutes. Test by rubbing the mixture between your fingers; it should feel completely smooth.

  • Transfer bowl to mixer stand. Using the whisk attachment, beat on high speed until mixture has cooled completely and formed stiff and glossy peaks, about 10 minutes.

  • Add the butter, one piece at a time, and beat until incorporated after each addition. Don't worry if the buttercream appears curdled after all the butter has been added; it will become smooth again with continued beating. Add vanilla, and beat just until combined.

  • Switch to the paddle attachment, and beat on the lowest speed to eliminate any air pockets, about 5 minutes. If using buttercream within several hours, cover bowl with plastic wrap, and set aside at room temperature in a cool environment. Or transfer to an airtight container, and store in the refrigerator, up to 3 days. Before using, bring buttercream to room temperature, and beat on the lowest speed with the paddle attachment until smooth, about 5 minutes.

  • Original recipe - creates a moist, pudding-like cake with sunken centers.


    Adjusted recipe but too much flour - It has great flavor and the texture was not bad but not as moist as the original recipe. The crackled tops indicate too much flour.


    Perfected recipe - This is the recipe posted. The crowns are perfect and the cake is moist.


    Frosting the Cupcakes - I experimented with two different tips. The huge 16" bag on the left holds a ton of frosting. I am also using a 12" disposal bag. I like to use cups to hold my bags when I fill them. These Rockies souveneir cups are perfect.


    Tips: Wilton 1M (Open Star (it's bent so it looks more like a closed star)), Wilton 2D (Drop Flower), and Ateco 847 (Closed Star). For the cupcakes, I used the Wilton 2D and the Ateco 847.


    This was frosted with an Ateco 847. The large closed star tip produced large soft serve swirls.


    My favorite tip for frosting cupcakes is the Wilton 2D. It produces nice ruffled swirls.


    Ingredient/Equipment Notes:

    Cocoa: I like the darker dutch processed cocoa for this cupcake. I tried the recipe with Valrhona, Guittard Cocoa Rouge, and Droste. I think they all worked really well. Use your favorite premium dutch cocoa.

    Buttermilk: I tried both reduced fat and full fat cultured buttermilk and it did not make a difference.

    Eggs: This is a Barefoot Contessa recipe. She likes to bake using extra large instead of the typical large egg. I'm not sure when she made the switch but I read her notes in one of her cookbooks.

    Coffee: I brew Lion Coffee's Toasted Coconut coffee but I'm sure any brand will do. I just happen to drink Lion brand at home.

    Cupcake pans: Buy the heaviest pans you can afford. I usually use heavy aluminum for my cakes but since I line my cupcake pans, I bought the cheaper heavy nonstick at Sur la Table.

    Cupcake liners: I like cute cupcake liners and have a whole collection of them but most of the time (and especially for dark cupcakes), I reach for the plain unbleached grease-proof liners.

    Half or 2/3 full? I used to fill my cupcake tins 2/3 full but found that I get much better results filling them half full.

    Sunday, August 15, 2010

    Spring Fling Cake from The Market in Larimer Square


    This is a recipe for the Spring Fling cake sold at The Market at Larimer Square.  It is a very unusual zucchini-based cake frosted with a whipped cream and cream cheese icing and topped with an abundance of fresh fruit.  The first time I had the cake was for a celebration at work.  I didn’t realize the cake cost $150 for the full sheet.  This recipe is for the 10 inch round that retails for $50.  When I lived in Lodo, I frequently walked over to The Market to buy a slice.  A slice cost just under $7.  I think it’s worth every penny.

    The cake itself is not hard to make.  It just requires gathering many ingredients together.  The Market usually tops their cake with strawberries, mango, kiwi, black grapes and mandarin oranges. I omitted the blueberries listed in the recipe because I don’t ever recall having blueberries on my cake.  I consulted the picture on The Market's website and I didn't spot a single blueberry.  I also subbed blackberries for the black grapes because I was feeling it.

    The recipe below was published by the Rocky Mountain News.   It calls for a 10 inch round cake pan.  I didn’t have a 10 inch round so I used a 10 inch scalloped pan instead.  I’ve also successfully used this recipe for cupcakes by filling the pan about three quarters full.

    EDIT: December 2017 

    I've been having trouble baking this cake since I moved from Denver to San Diego.  Initially, I blamed it on the oven but other cakes and breads come out fine. I then moved from baking it in my 10 inch Fat Daddios aluminum cake pan to two 8 inch Fat Daddios aluminum pan and finally to two 9 inch Calphalon nonstick pans.  Nothing made a difference.  The cake tasted fine but the texture was gummy and almost uncooked. 

    I read and reread the recipe, trying to figure it out why the cake failed.  From the comments below, it looks like others ran into the same problem. It is not a particularly fragile cake so it's shouldn't be so finicky. Then it clicked! The amount of leavening for 3 1/4 cups of flour seems really low. The paltry amount of leavening worked fine at 5,280 feet above sea level but was not enough for sea level.  I tested it out by making half the recipe and doubling the baking powder and soda and it worked! I probably need to tinker with the recipe a bit more but for now, it works.

    Friday, July 30, 2010

    Coconut Pineapple Carrot Cake with Cream Cheese Frosting


    This is the only way I make my carrot cake.  To me carrot cake should be fully-loaded with raisins, pineapple, coconut, nuts, and carrots. 


    Coconut Pineapple Carrot Cake

    1 cup raisins, plumped by soaking in hot water (I usually use golden raisins but I didn't have enough golden raisins so a mix of golden and dark raisins went into the cake.)
    2 cups all purpose flour
    2 teaspoons baking powder
    1 teaspoon baking soda
    ½ teaspoon salt
    1 teaspoon cinnamon
    1 teaspoon nutmeg
    1 teaspoon ground ginger
    ½ teaspoon allspice
    4 large eggs
    2 cups sugar
    2 teaspoons vanilla
    1 ¼ canola oil
    2 ½ cups coarsely grated carrots
    1 8 ounce can pineapple, drained and chopped
    1 cup sweetened coconut flakes
    1 cup walnuts, chopped
    ½ cup toasted coconut flakes for decorating (optional)

    1.    Preheat oven to 350 degrees.  Line two 9” round cake pans.
    2.    Mix flour, baking powder, baking soda, salt, cinnamon, nutmeg and allspice in a medium bowl.  Set aside.
    3.    Beat eggs until foamy, continue to beat while adding vanilla and sugar.  When mixture is thick, add oil.  Mix well.
    4.    Add flour mixture and mix just until moistened.
    5.    Fold in raisins, carrots, pineapple, coconut and walnuts.
    6.    Divide batter between pans and bake about 50 minutes or until wooden skewer inserted in center comes out clean.
    7.    Cool completely and level cake before frosting.


    Cream Cheese Frosting:
    1 1/2 sticks unsalted butter, room temp
    1/2 teaspoon vanilla
    1/4 teaspoon almond extract
    3/4 pound powdered sugar
    8 ounces (1 brick) cream cheese, cold

    In the bowl of an electric mixture, cream together butter vanila and almond extract. Add powdered sugar and continue creaming until mixed. Add cream cheese and mix until light and fluffy.

    Sunday, July 18, 2010

    High Altitude Red Velvet (and Aqua Velvet) Cupcakes


    Red velvet are the most problematic cakes for me. I can't get them just right at this altitude. I think it's a combination of leavening issues, flour structure issues, and weird chemical reactions of the acidic ingredients (vinegar, buttermilk and even natural cocoa powder) with the baking soda. I've been experimenting with a high altitude red velvet cupcake recipe and although I am not completely satisfied, it works (sort of) and tastes delicious. The cupcakes need additional experimenting but the cream cheese frosting is perfect.

    I made a batch using my adjusted recipe from last year and then I made a batch subbing all purpose flour for cake flour. I had to remind myself why I wanted to make cake flour work at high altitude. The crumb is much better. The recipe below will still result in subtly sunken middles, but the trade off in texture is worth it. I'll experiment with mixing cake and all purpose flours next time. I cannot look at another red (or aqua) velvet cupcake at the moment.

    Wednesday, July 07, 2010

    Best Cocoa Brownies and the Quest for the Best Cocoa Powder


    How many batches of brownies can I bake over the course of a week? A lot. I've been testing different brands of cocoa powders.

    Cocoa powder is something I have in my pantry but rarely give it a second thought. I buy the Ghirardelli because it’s the fanciest-looking cocoa powder on the grocery store shelf. Cocoa is (was) not something I would drive out of my way for.

    When I was working on my icing for black and white cookies, the recipe specified Dutch processed cocoa. Interesting. That’s the Hershey’s stuff that I used to buy, right? I haven’t bought Hershey’s cocoa in ages but I remember it being Dutch processed. I found it strange when I saw a post on a cooking discussion board asking about where to buy Dutch processed cocoa. I thought Dutch processed was the common stuff.

    After stopping by my local spice shop, to pick up some black onyx cocoa, I walked over to the grocery store to read the Hershey’s label. It was not Dutch processed! When did Hershey’s switch from Dutched to natural? I did find a Special Dark version next to the regular version. The Special Dark is a blend of natural and Dutched cocoas. I haven’t tried it but I hear it’s terrible.

    So is natural better than Dutched? Some people seem to think so but in a blind taste test conducted by Cooks Illustrated, Dutched won in every single category. I found this pretty interesting. Apparently, by Dutch processing the cocoa, the cocoa tastes more “chocolatey.” The process neutralizes some acidic flavor notes and also produces a darker cocoa.

    So in the taste test, Dutching was good but over-Dutching was bad. I read this after using the super-Dutched cocoa for my icing. I was very disappointed. I don’t know how to describe the flavor. It was flat, stale and burnt. I loved the color so my plan was to mix the black onyx with some Dutched cocoa. I bought a few different brands to test out.

    I tested the cocoas using a cocoa brownie recipe by Alice Medrich.