Saturday, February 28, 2009

Pan de Sal

My mom used to stop by Valerio's Bakery every couple of days to pick up freshly baked pan de sal for us. It was so cheap. I think they were 18 for $1. Why make them if they are that cheap? Well unlike San Diego, Denver does not have a huge filipino population. There is no Valerio's Bakery. I still crave these rolls from time to time and I do not like to haul food on the airplane so that I can freeze it for later. The only way for me to enjoy fresh pan de sal is to make it myself. These rolls are little mounds of heaven.

I came across this recipe http://pinoyamericanrecipes.blogspot.com/2008/10/pandesal-philippine-dinner-rolls.html and tried it a few weeks ago. It is a bread machine recipe so I adapted it for my Kitchenaid. I also tweaked it a little to get a flavor closer to Valerio's. The flavor of the original recipe was good but it wasn't as sweet as I remembered. I'm just used to what I grew up on. The tweaked recipe is nearly identical in taste to Valerio's. The recipe is actually really easy compared to a lot of other bread recipes. It doesn't require a pre-ferment, a ferment, a starter, a second rise, or even a first rise. You simply mix the dough, let it rest a few minutes, shape, let rise, bake and enjoy. The results are amazing.

1/2 stick butter, cut into small pieces
2 1/2 cups whole milk (I don't usually have whole milk in the house. I used 2 cups skim and 1/2 cup of half and half)
1 extra large egg
1/2 cup baker's sugar
5 to 6 1/2 cups bread flour (the original recipe calls for 5 cups of flour but after some feedback, I'm listing a range)
1 tablespoon instant yeast
2 teaspoons dough enhancer
1 tablespoon vital wheat gluten
1 1/2 teaspoons sea salt

To dust:
Plain bread crumbs

1. In a large measuring cup, combine butter and 1 cup milk and microwave about 1 minute. Make sure butter is all melted. Add the rest of the milk and egg. Beat everything together. Check the temp of the liquid. Make sure it is under 100 degrees.
2. In the bowl of stand mixer, combine the rest of the ingredients (start with about 4 1/2 cups of flour) and mix together. Add milk mixture and stir with a wooden spoon until combined. You may need to ditch the wooden spoon and continue mixing with your hand.
3. Using the dough hook, knead for about 8 minutes. I usually have to knead for about 4 minutes. Let the mixer cool a few minutes and then finish kneading. While kneading, add the reserved half cup of flour a tablepoon at a time until the dough clears the sides of the bowl. You want a dough that is wet enough but not too wet.
4. Rest the dough about 15 minutes.
5. Divide the dough into two pieces and flatten into a rectangle about a half in thick and 18 to 24 inches wide. Roll the dough like making cinnamon rolls, starting from the edge closer to you. You want to roll it very tight. Seal the seams and ends, using your thumb and index finger. I like to squeeze the dough towards the middle and stretch it back out to get a more uniform roll. Cut into 1 1/2 to 2 inch pieces.

The oil and spices in the background were for the tomato sauce I was simultaneously making for the lasagna.

6. To shape: Take a piece of of dough, flatten between the palms of yours hands. You want to flatten the cut ends. How do I describe it? The two cut sides should touch each palm. You want a flat retangle. Roll each piece in plain bread crumbs and place on a silicone lined baking sheet about an inch apart. It is okay if they touch.
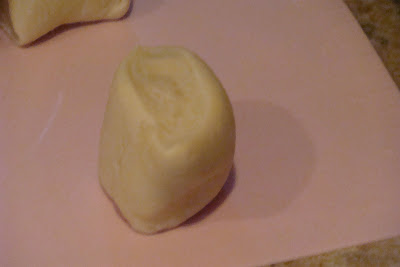
Flip the dough so that it is sitting on one of the cut ends. Pick it up and place on your left palm, take your right palm and flatten.

Roll in plain bread crumbs.

7. Cover with plastic wrap and let rise in a warm draft free place about an hour.
8. Bake in 350 degree preheated oven about 20 minutes or until slightly golden.

First batch:
Both batches:
***Edit***
I make this recipe often. Below are pictures from a batch I made on February 20, 2010.


Thursday, February 26, 2009

Red Velvet Cupcakes


Makes 24 cupcakes

2 1/2 cups + 3 tablespoons sifted cake flour
scant 1 teaspoon baking powder*
1 teaspoon sea salt
2 tablespoons Ghirardelli unsweetened cocoa powder
1/4 teaspoon red gel food coloring (I used Wilton brand. It is cheaper than buying regular food coloring)
1/2 cup unsalted butter, softened
1 1/2 cups baker's sugar (use slightly less than 1 1/2 cups)
2 extra large eggs, at room temperature
1 teaspoon vanilla extract
1 cup buttermilk, at room temperature
1 teaspoon white vinegar
scant teaspoon baking soda

1. Preheat oven to 350 degrees. Line two 12-cup muffin tins with cupcake papers. (I did half regular white cupcake liners and halt nut cups. For the nut cups, make a small snip on the edge of the cup to make it easier to remove the cupcake from the cup.)

2. Sift together flour, baking powder, and salt in a medium bowl; set aside.

3. Beat together butter and sugar until light and fluffy. Using my Kitchenaid it took about a minute. First start off slow and increase speed.

4. Beat in eggs, one at a time and then beat in vanilla and red gel color. Remove from stand mixer.

5. Add half of the flour mixture to the butter mixture. Using a spatula, fold until incorporated. Add half of the buttermilk and fold until incorporated. Fold in last half of flour mixture and then last half of buttermilk. (The reason why I use a rubber spatula instead of finishing with the Kitchenaid is because I do not want to overmix the batter. It is too easy for my to overmix in the stand mixer. I sometimes walk off to do something and then momentarily forget that the mixer is still running. It is a habit because I do a lot of bread dough.)

6. In the mixing cup used to measure the buttermilk, add baking soda and vinegar. Add the vinegar mixure to the batter and mix well.

7. Fill muffin cups half full. Bake in a single layer in middle rack for about 20 minutes. Do not open the oven door.

8. Remove cupcakes from muffin tins and cool completely before frosting.

Cream Cheese Frosting from the Barefoot Contessa:

  • 1 pound cream cheese at room temperature
  • 3/4 pound (3 sticks) unsalted butter, room temperature
  • 1 teaspoon pure vanilla extract
  • 1/2 teaspoon pure almond extract
  • 1 1/2 pounds confectioners' sugar, sifted
In the bowl of an electric mixer fitted with the paddle attachment, on low speed, cream together the cream cheese, butter, and vanilla and almond extracts. Add the confectioners' sugar and mix until light and fluffy. This can take a few minutes.

High altitude and tips for success:

1. Use slightly less leavening (baking soda and baking powder).
2. Increase flour by a few tablespoons.
3. Use extra large eggs when recipe calls for large eggs. The lecithin in the eggs help. The Barefoot Contessa said in her most recent book that her baking improved when she started using extra large eggs. I now buy only extra large eggs.
4. Use slightly less sugar.
5. Fill only half the cup. These cupcakes gets so much rise. I have to bake the ones in the nut cups in muffin tins. I once tried baking them on a baking sheet. I also filled them 2/3 full and they overflowed and there was no lip of the muffin tins to catch the overflow. They went straight down the sides of the nut cups. They were not pretty.

*I tried a recipe that only used baking soda as the leavening. The cupcakes sunk in the middle. When I used baking powder in addition to the soda, the cupcakes started to sink but as they heated up, they started to rise. Baking soda rises when wet. Double-acting baking powder rises when added to liquid and rises again when heated. I also read somewhere that in order to get domed instead of flat cupcakes I should heat the oven to 400 degrees, put the tins in and lower the temp to 350 degrees. I'll try it next time.

I used two different liners. I used nut cups and regular white liners. I also have red liners that I found in the asian section of Cost Plus. Both are very pretty. I don't like those pastel Reynold's baking cups. I buy cupcake liners whenever I find cute ones. I would love those fancy wrappers but they are too expensive to be practical. I am cheap.


I don't believe in piping frosting.


Tuesday, February 24, 2009

Sourdough Bread Take Two

This time around I made it with Aki the organic rye berry and pineapple juice starter. (By this time Aki had been converted to a white starter.)

1 1/2 cups of starter
1/2 cup rye flour
3 cups unbleached AP flour (maybe more or less depending on the hydration of the starter)
1/4 teaspoon bread machine yeast (for insurance)
1.5 cups water
3 tablespoons honey
2 teaspoons salt

Sunday night:
1. Take a little starter and feed it about 1 1/2 cups flour, 1 tablespoon rye flour and water. I do it approximate and eyeball the consistency. I left it out about four hours at room temperature, refrigerated it overnight, and then took it out to monitor. The reason why I did this was because on Sunday morning I threw out most of the starter and fed it in the morning. I didn't allow the starter to double. I only left it out a few hours and then stuck it in the fridge. Later that night I had an urge to make sourdough and my starter was not exactly ready to for another feeding.

Monday evening 6pm
2. I poured the starter into the bowl of my Kitchenaid mixer. I added slightly warmed water and whisked it until it was a liquidy.
3. I added honey and whisked while the water was warm.
4. I added 1/4 teaspoon of yeast for insurance. I wanted to make sure the bread rose since the I didn't feed the starter correctly. I was more interested in the taste of the bread than in remaining a wild yeast purist.
5. I added the rye flour and mixed.
6. I slowly added AP flour a cup at a time until the dough was stiff enough to handle. The dough was still fairly moist. I read that larger holes are achieved from wetter doughs but you often get a flatter bread as a result. How to compromise? I baked it in a cast iron skillet so it wouldn't spread out more than the perimeter of the skillet.
7. Knead for about 4 minutes on setting 2 of the Kitchenaid.
8. Let it sit for about 30 minutes covered in the mixing bowl.
9. Add salt and knead another 4 minutes.
10. Place in an oiled boil that is flat and wide enough to allow folding without having to remove it from the bowl.
11. Let the dough ferment at room temp for 2 1/2 hours with folds at 50 and 100 minutes.
12. Shape the dough into a nicely rounded boule and divide into smaller pieces to make smaller boules. I did one big one in a 9 inch cast iron skillet lined with parchment. If making several loaves, divide dough and then let it rest about 20 minutes before shaping.
13. After shaping, cover dough and let rise for 1 1/2 hours at room temp and then refrigerate for up to 16 hours. I shaped, let it rise for 1 1/2 hours, and refrigerated the entire cast iron skillet. I covered with a large plastic bowl. I don't like to use plastic wrap much and avoid it whenever possible.
14. In the morning, preheat oven to 475 degrees. While the oven is preheating, take the dough out of the refrigerator. Also boil a pot of water in an oven-proof pan and fill a spray bottle with water.
15. When oven is preheated and water is boiled, put the pot of water on the first shelf of the oven. Bake the bread on the second shelf. Turn down the heat to 450 degrees. Generously spray the loaf with water about every five minutes for the first 20 minutes of baking. The pot of water should boil during the entire baking process.
16. Bake for about 30-40 minutes. (Depends on the size of your loaves.)
17. Let cool before slicing. (Something I never do.)

Loaf right out of the refrigerator.


I wanted a little more blistering. The blisters are present but really small. I guess I have to refrigerate it longer?

I never wait for the bread to cool before slicing.

I think the dough was a little too wet because the bread was too moist and almost gummy. Not gummy like the no-knead bread but definitely a little gummier than I would like. After the bread cooled, the gumminest went away and was perfect. The entire loaf was gone by the end of the day.

Monday, February 23, 2009

Carl Griffith's Oregan Trail Sourdough Starter


I received Carl Griffith's 1847 sourdough starter a few weeks ago. I was getting ready to leave town and did not want to activate it and leave. Taking the starter on the trip with me was not an option. I was tired all of last week and actually contemplated holding off on activating it since I have my other two starters in the refrigerator. They take up too much room. I actually don't keep a huge amount of starter on hand. I keep just a few tablespoons and allow it to rise. I think I can actually move them from the quart containers into smaller containers.

On a whim I decided to activate Carl's starter. I ran out of my quart containers. I thought it was impossible but it is possible. I just had soupgroup and I just made a huge pot of pho and froze the extra soup broth in the containers. I am curious how the Oregon Trail starter tastes. Barry (aka starter B) rose really well, smelled great, but I wasn't thrilled with the flavor. I got a really sour bread but the flavor was flat. I didn't get anything else. Maybe it needs to mature a little more. I baked with it when it was only a few weeks old. The pancakes were yummy but I think that was because of the milk and the other ingredients I used.

Aki (aka starter A) was turned into a loaf today. It is sitting in my refrigerator. I will bake it in the morning. I discard most of it on Sunday morning and fed it. I threw away part of it because I wasn't really planning on baking bread. More on Aki Sourdough loaf on a different post. Back to Carl.

I mixed the dried starter with bottled water, stirred, and stirred some more to get the particles to dissolve. It is pretty much like concrete. I let it sit a while. It took a while before it all dissolved. I smelled it. It already has a sour-ish smell. Not the good sour smell but the early stages of the starter smell.


After sitting for fifteen minutes and I still had huge chunks.
Finally after about half an hour the bits of dried starter started to dissolve. I then added bread flour for a thick pancake-like batter.

About 36 hours after reviving. The starter was all bubbly when I woke up in the morning. It looks like a metal spoon in the container but it is actually a plastic spoon that looks like metal.


I didn't throw away half before feeding because I was giving half of it away. It still more than doubled. The starter smells really yummy!
It is definitely easier to get a starter going with dried starter. I have some of Barry dried. I need to dry Aki and the Oregon Trail starter just in case something happens. I think I have too much Barry starter. I need to start giving some away.

Saturday, February 21, 2009

Lavender Shortbread Cookies


I used my regular recipe for shortbread cookies, subbed vanilla extract for the almond extract and added about a tablespoon of dried lavender.

  • 1 cup butter, softened
  • 1/2 cup white baker's sugar
  • 2 teaspoons vanilla extract
  • 1 tablespoon dried lavender buds
  • 2 1/2 cups sifted all-purpose flour
  • milk, as needed
1. Cream together butter and sugar. Add vanilla extract and lavender, beat until mixed.
2. Slowly mix in flour.
3. Drizzle in a little milk until dough forms a ball. You want a very dry dough but I find that a little milk helps pull it all together. I also live in Denver where it is very dry and I often need to add a little more liquid or less flour whenever I make a dough.
4. Refrigerate dough. I left the dough on the counter overnight. It is cold downstairs in my house.
5. Roll dough out about 1/4" thick. Cut with small cookie cutters. I used small hearts. I really wanted small daisy shaped cutters.
6. Bake in a 300 degree oven for about 25 minutes until bottoms are slightly browned.
This entry was posted in

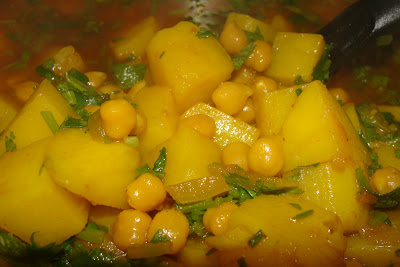
Aloo Chole (Potato Garbanzo Bean Curry)


I made this for soupgroup. I wanted to make the potato dish often served at indian restaurants. I was not sure what the dish was called. Instead of potatoes and peas or potatoes and cauliflower, I decided to make a potato and garbanzo bean combination.

1 lb. garbanzo beans, rinsed
4 tablespoons ghee (clarified butter)
1 large onion, finely diced
3 cloves garlic, minced
5 lbs Yukon gold potatoes, peeled and cubed
2 teaspoons tumeric
1 to 2 teaspoon cayenne pepper
1 tablespoon garam masala
2 teaspoons madras curry powder
2 pinches asafetida
4 green cardamon pods
1 teaspoon minced fresh ginger
1 tomato, diced
2 teaspoons tomato powder
2 tablespoons honey
8 cups vegetable or chicken stock
sea salt, to taste
½ cup fresh cilantro leaves, chopped

1. Bring garbanzo beans to a boil. Cover and let sit overnight.
2. Boil garbanzo beans until almost tender.
3. In a large pot, heat ghee. Add onions and garlic and sauté until translucent. Do not burn the garlic.
4. Add potatoes and sauté a few minutes. Add tumeric, cayenne, garam masala, curry powder, asafetida, and cardamon pods. Saute a few minutes until fragrant.
5. Add ginger, tomato powder, and stock. Bring to a boil. Add garbanzo beans and simmer until potatoes and garbanzos are tender. Add salt. Garnish with cilantro.

It tastes better if you let it sit for a few hours. The potatoes and garbanzo beans will absorb all the yummy spices. The spices (including the asafetida, tomato powder, garam massala, madras curry, and cardamon pods) are from Savory Spice Shop.


All packed in official soupgroup containers.

Thursday, February 19, 2009

Dim Sum at Pearl Restaurant in Rancho Bernardo, CA

I was in San Diego this past weekend (long story). We met up with some friends for dim sum. Yum.

This was only part of the spread. I forgot to take more pictures are we acquired more food.
Chicken Feet
Chinese Sausage Fried Rice in the foreground and shrimp rice rolls and gai lan in the background
Shrimp Rice Rolls. We also got bbq pork rice rolls.

Chicken Buns. We also got a few orders of the bbq pork buns.

BF with Travis

BF taking Travis to see the ducks. The brother is also in the picture.

Duck pond

Wednesday, February 18, 2009

Spice Haul


I notice that the lens of my camera is dirty.

I went to Savory Spice Shop www.savoryspiceshop.com to pick up some asafetida for my aloo chole that I am making for SoupGroup this weekend. (Technically aloo chole is not a soup but we usually bend the rules and put different items into our SoupGroup containers.) I was like a kid in a candy store. I am this way in a lot of different stores (i.e. makeup, shoe, book...). I spent $60.60 at the spice store.

I bought:
1. Fancy Green Cardamon Pods
2. Tikka Masala blend
3. Mexican Cut Oregano
4. Ground Ancho Chile
5. Ground Cayenne
6. Tomato Powder
7. Asafetida
and
Deluxe Curry Set w/ ten bottles of spices:
1. Vindaloo
2. Red Thai Curry
3. Mild Yellow Curry
4. Rogan Josh
5. Zanzibar Curry Powder
6. Chat Masala
7. Garam Masala
8. Cambodian Lemongrass Curry
9. Tandoori Seasoning
10. Madras Curry

I really like curry. I prefer Mae Ploy brand thai red curry paste but I couldn't resist the set.